Features
Input recording, macro playback, macro editing including trigger configuration and playback settings.
Overview
ConsoleMacros PX lets you record controller inputs and play them back with configurable triggers. Recorded inputs are saved as macros that can be organized into folders, edited, exported, and shared.
The typical workflow is:
- Record controller inputs on the Record Screen.
- Save the recording as a named macro.
- Manage macros on the Macros Screen — organize into folders, configure triggers, and activate.
- Edit macros in the Macro Editor to fine-tune individual inputs, timing, and playback settings.
- Play — activate macros and use triggers to start and stop them during live gameplay.
You can also create macros from scratch in the editor without recording, or import macros shared by others.
Using macros or other input features of the App during online multiplayer gameplay may violate the terms of service of the game or platform and may result in account suspensions or bans. Some games may prohibit or penalize macro use even in offline or single-player modes. You are responsible for ensuring that your use complies with any applicable terms or policies. See the EULA for full details.
Record Screen
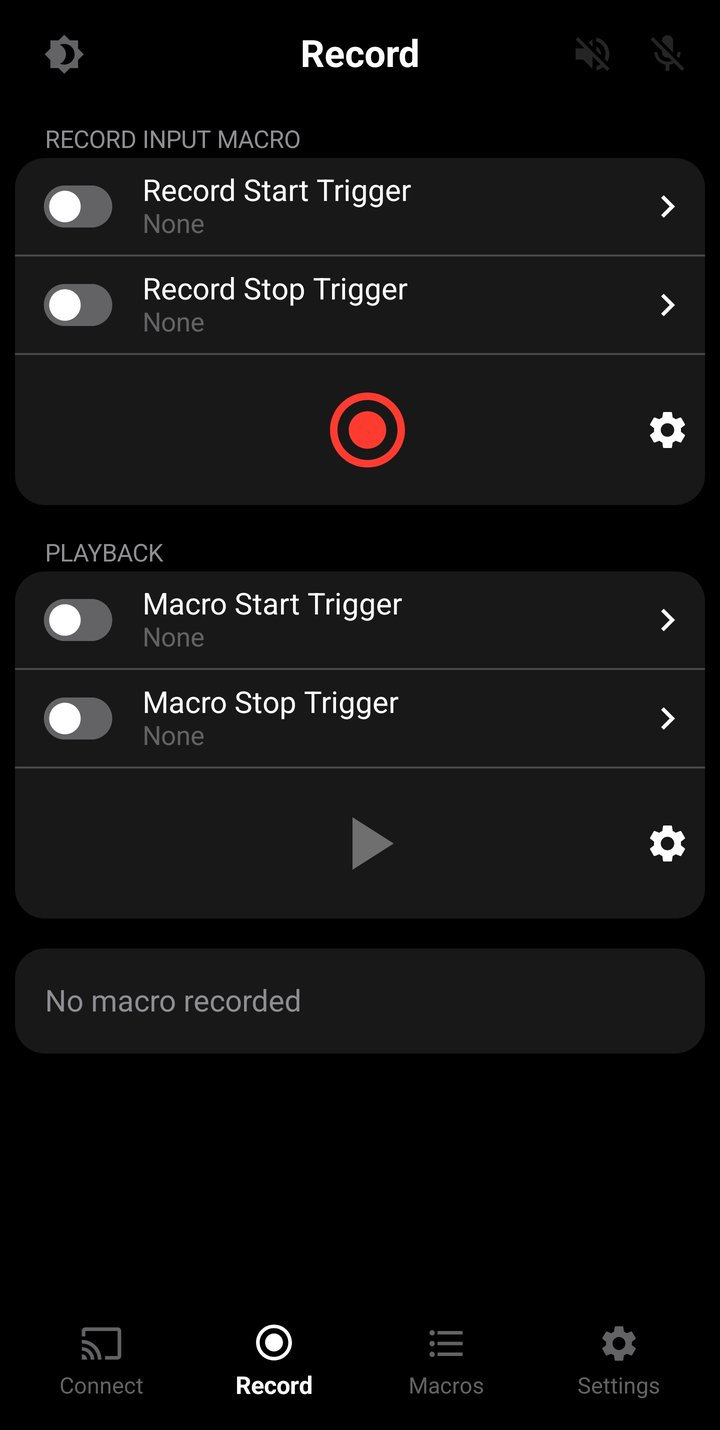
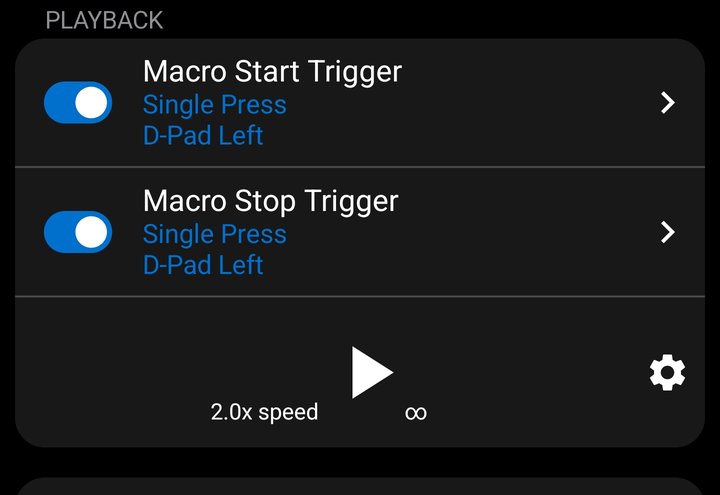
The Record Screen is where you capture controller inputs and play them before saving. It is split into two sections: the Recording container (for capturing inputs) and Playback (for playing what you recorded).
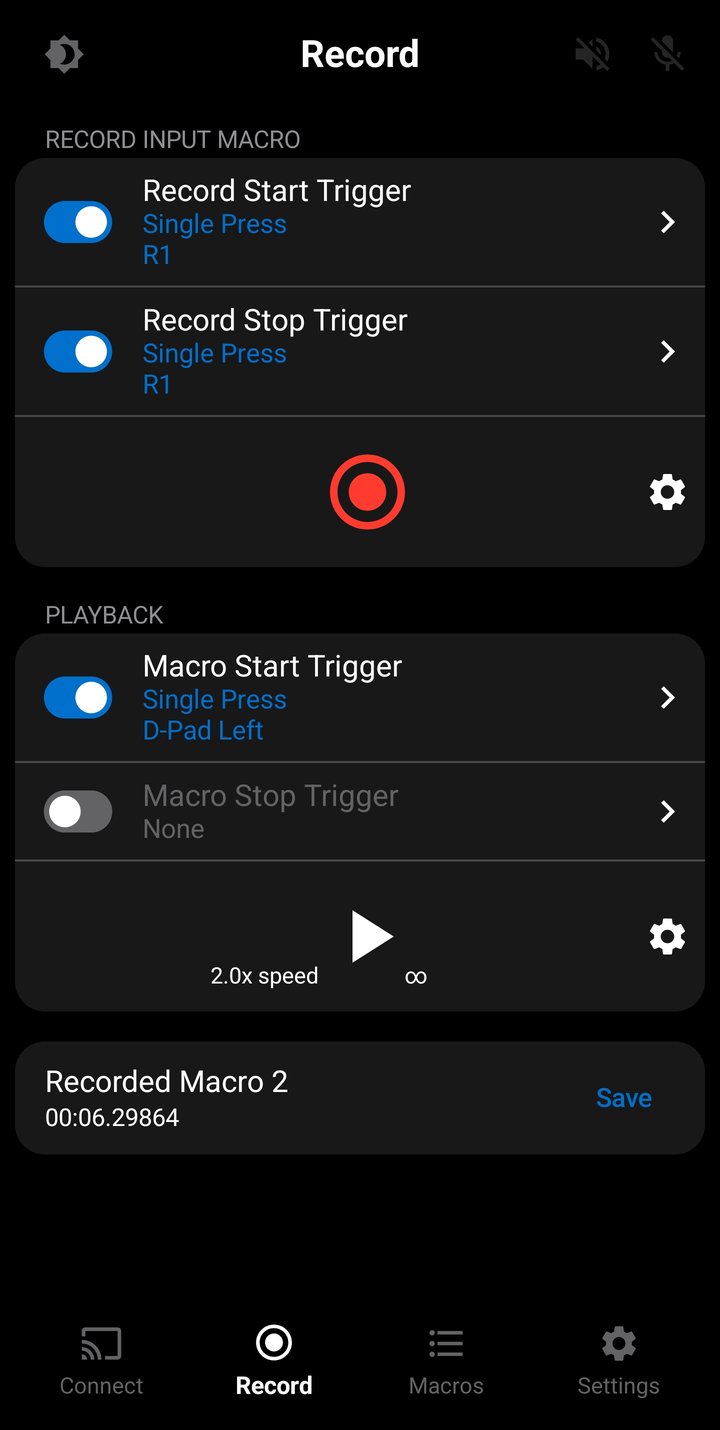
Each section has its own start and stop triggers, a play/record button, and a settings icon for configuring options. Below both sections, the current macro status is displayed — the macro name, duration, and a Save button when a recording is ready.
Recording Inputs
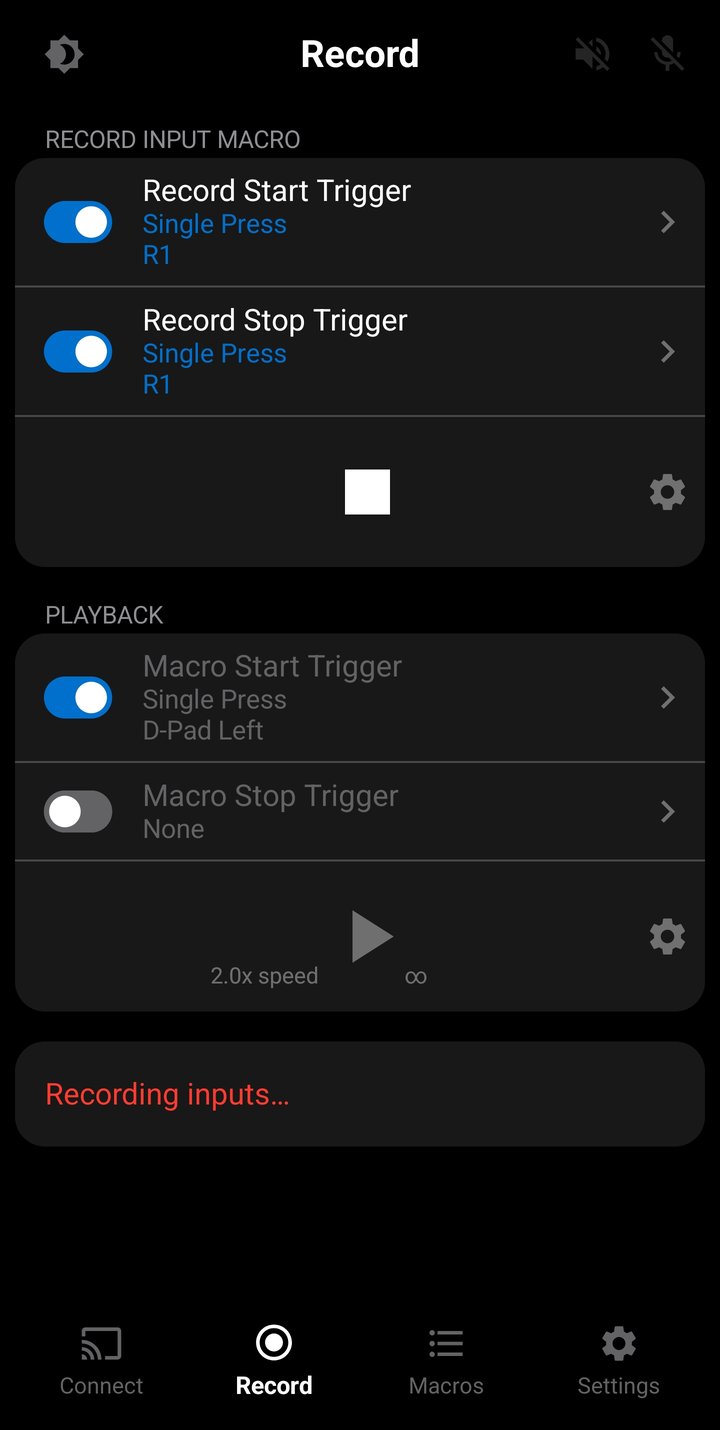
To record, connect a controller to your phone via USB or Bluetooth, then tap the Record button (or use a configured Start Trigger). Inputs from the controller will start being recorded according to the recording options. When Start on First Input is enabled, the status area shows "Waiting for first input..." in red until the first input is received, then changes to "Recording inputs...". When it is disabled, "Recording inputs..." appears as soon as recording starts.
A controller must be connected to your phone before you can start recording. If no controller is detected, you'll see a "Connect a controller" message.
Recording stops when you tap the Stop button, use a configured Stop Trigger, or when the maximum recording duration for your tier is reached — see Limits for details. If you navigate to a different screen or minimize the app, the recording also stops and the macro is saved up to that point. If no inputs are detected during a recording, the recording is discarded and a message is shown.
Each input is saved as an individual macro entry the moment it is received from the controller. The exception is analog sticks — the left and right stick positions are always saved together in a single entry as per the remote play protocol.
Every entry is stamped with a high-precision timestamp in the format MM:SS.sssss, where MM is minutes (00–59), SS is seconds (00–59), and sssss is five sub-second digits giving a resolution of 0.01 milliseconds (10 microseconds). The full timestamp range is 00:00.00000 to 59:59.99999, supporting recordings up to 1 hour.
Recording Options
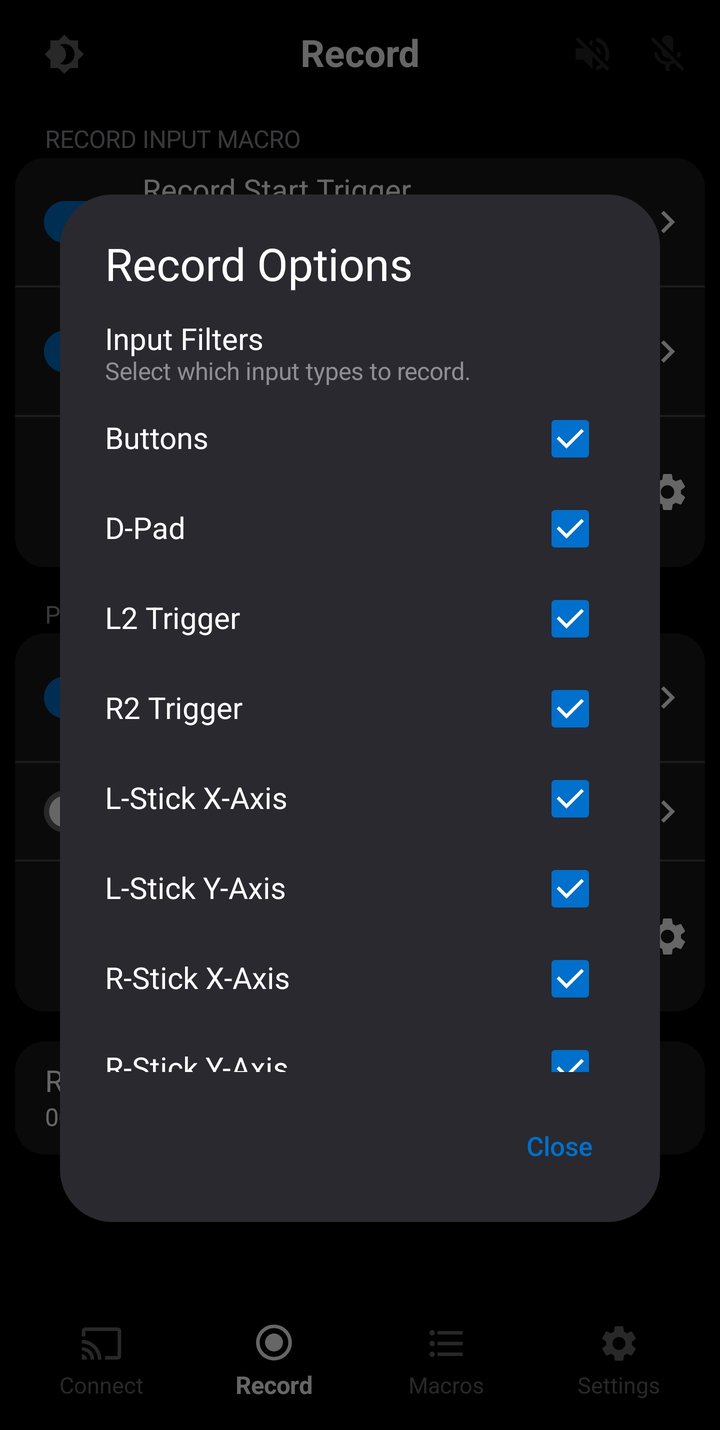
Tap the gear icon next to the Record button to open the Recording Options. These settings control what gets recorded and how recording starts and stops.
Input Filters
Each input type can be individually enabled or disabled. Disabled inputs are filtered out during recording so they don't appear in the final macro. For example, you might disable stick recording if you only want to capture button presses.
- Buttons — Cross, Circle, Square, Triangle, L1, R1, L3, R3, Options, Share, PS
- D-Pad — Directional d-pad inputs (Up, Down, Left, Right).
- L2 Trigger — Left analog trigger.
- R2 Trigger — Right analog trigger.
- Left Stick X — Left analog stick horizontal axis (-32768-32767).
- Left Stick Y — Left analog stick vertical axis (-32768-32767).
- Right Stick X — Right analog stick horizontal axis (-32768-32767).
- Right Stick Y — Right analog stick vertical axis (-32768-32767).
- Touchpad — Touchpad touch, movement events(X: 0–1920, Y: 0–942) and touchpad press button
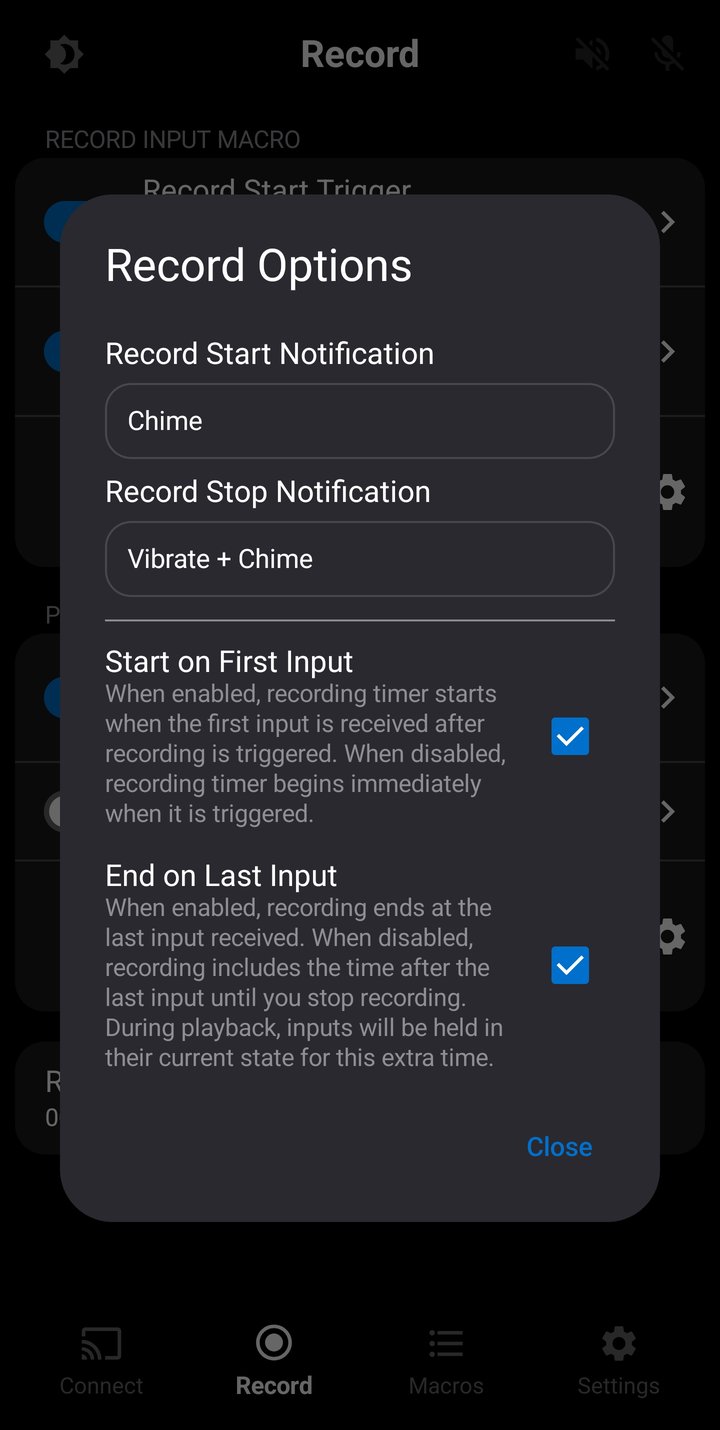
Notifications
You can configure separate notifications for when recording starts and stops, so you get feedback without needing to look at the screen — useful when recording with triggers while focused on gameplay.
- None — No notification.
- Vibrate — A short vibration pulse on the connected controller (100ms, maximum intensity).
- Chime — An audio tone played through the phone speaker. The start tone is a higher pitch (880 Hz) and the stop tone is a lower pitch (587 Hz), making them easy to distinguish.
- Vibrate + Chime — Both vibration and audio tone together.
Recording Timing
- Start on First Input — When enabled, the recording timer begins at the moment the first controller input is detected rather than when the Record button is pressed. The first entry in your recorded macro will always be at time stamp
00:00.00000. This avoids a gap of silence at the beginning of the recording if you take a moment before pressing a button. When disabled, the timer starts immediately when recording begins. - End on Last Input — When enabled, the recording is trimmed to the last detected input when you stop recording, removing any trailing silence. When disabled, the full duration from start to stop is kept, including any time after the last input. The trailing time will appear as the End Delay(
+00:00.00000)in the macro.
Saving Recordings
When a recording is ready, its name and duration appear at the bottom of the screen. Names are incremented automatically for each recording.
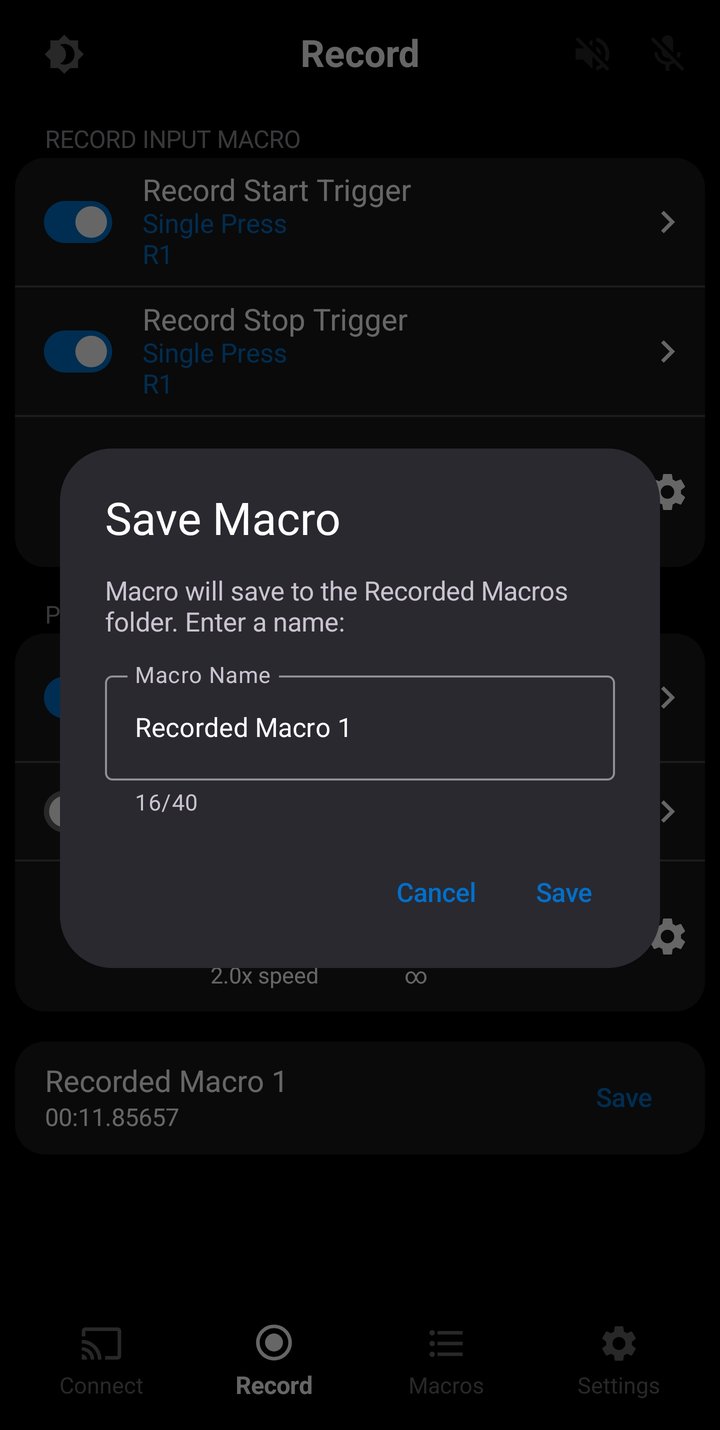
A Save button also appears to the right of the macro name. Tap it to open the Save dialog. Choose the folder to save into, enter a name for the macro (up to 40 characters), and tap Save. The folder list defaults to Recorded Macros and includes any folders you have created.
The macro's name and input entries are saved locally on the phone. Saved macros appear on the Macros Screen, in the folder you chose. A newly saved macro keeps the start/stop triggers and the playback options (loop, seamless loop, and playback speed) configured on the Record Screen, so the setup you tested the recording with travels with the macro. Its toggle is always off when saved, so its triggers are not armed until you turn it on from the Macros Screen.
Local recordings are stored in memory only, they are lost if you close the app. New recordings will also overwrite any existing recordings on this screen. Save your recorded macro if you want to keep it.
Playback
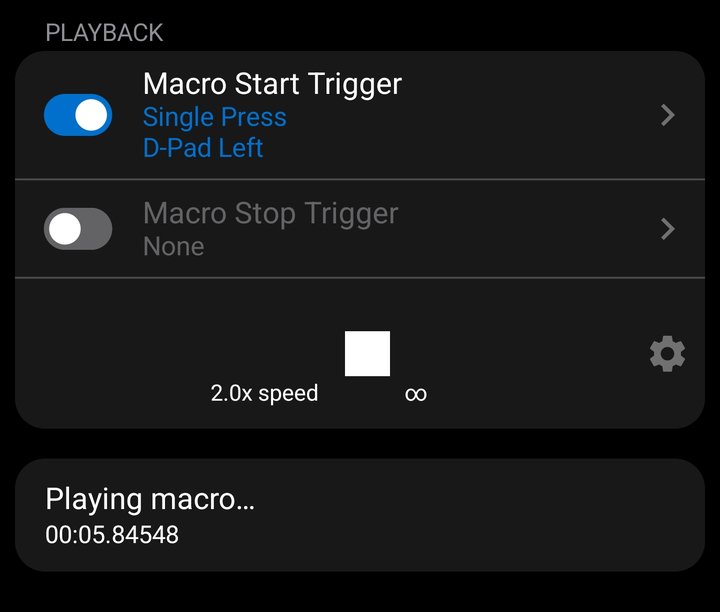
After recording, you can play back the macro using the Play button. During playback, the status area shows "Playing macro..." and the recorded inputs are sent to the console exactly as they were captured. If there is no active console connection, the macro will still play through its duration but inputs are not sent anywhere.
Playback is useful for verifying your recording before saving. You can play it back multiple times, adjust playback options, and re-record if needed. The local recording stays in memory until you record a new macro, or close the app.
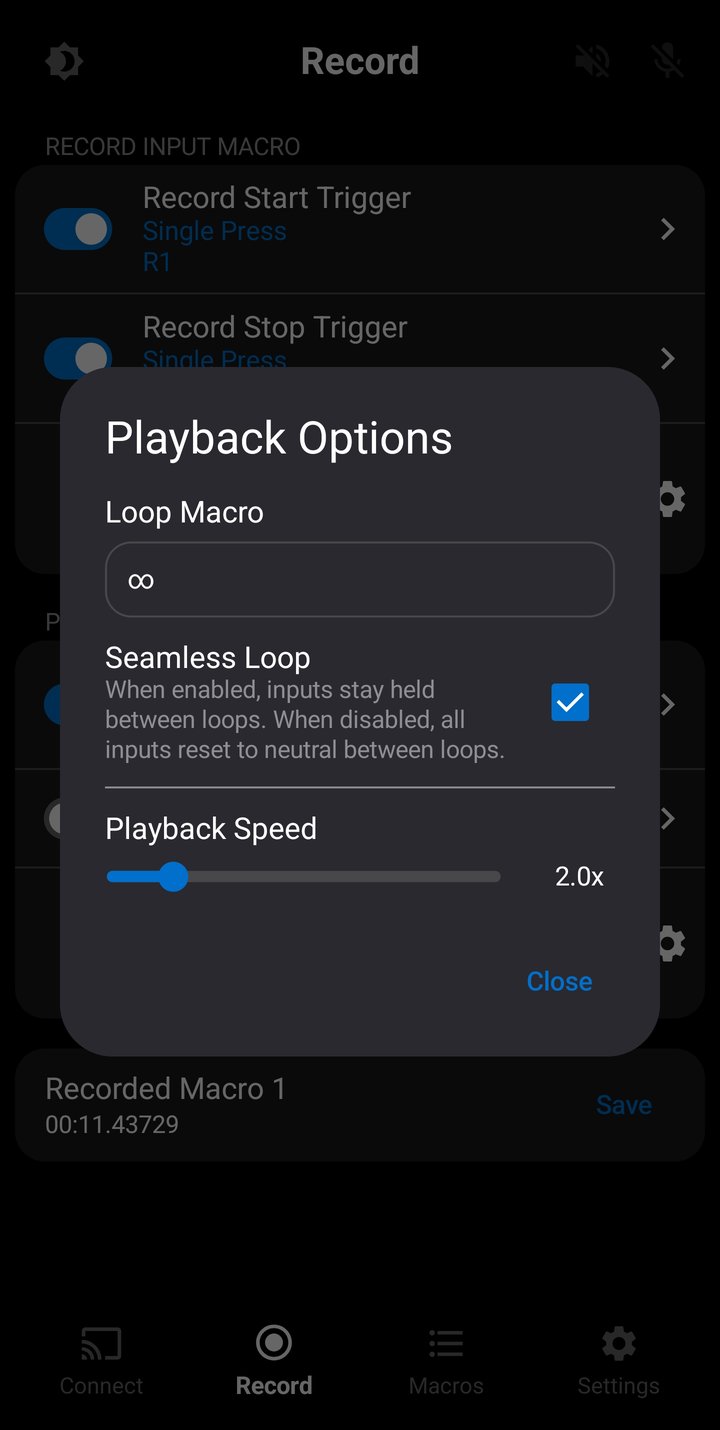
Playback Options
Tap the gear icon next to the Play button to open the Playback Options dialog. These settings apply to the current local recording.
- Loop — Choose how many times the macro repeats: Off (play once), x2 through x10, or infinite looping. When looping is enabled, a badge appears on the Play button showing the loop count or an infinity symbol.
- Seamless Loop — When enabled, the macro loops continuously without resetting inputs between iterations. When disabled, inputs return to neutral briefly between each loop. This option only appears when loop count is 2 or higher (or infinite). Neutral for buttons means a released state, for L2/R2 Triggers a value of 0 and for sticks an (X,Y) value of 0. For touchpad values, neutral is a touch up event at the last known position.
- Playback Speed — Adjust playback speed from 0.10x (a tenth of the recorded speed) to 10.00x (ten times faster). The slider allows 0.01x increments. Tap the speed value to type an exact number. When speed is not 1.00x, the current speed is shown next to the Play button.
Record/Playback Triggers
The Record Screen has four configurable triggers:
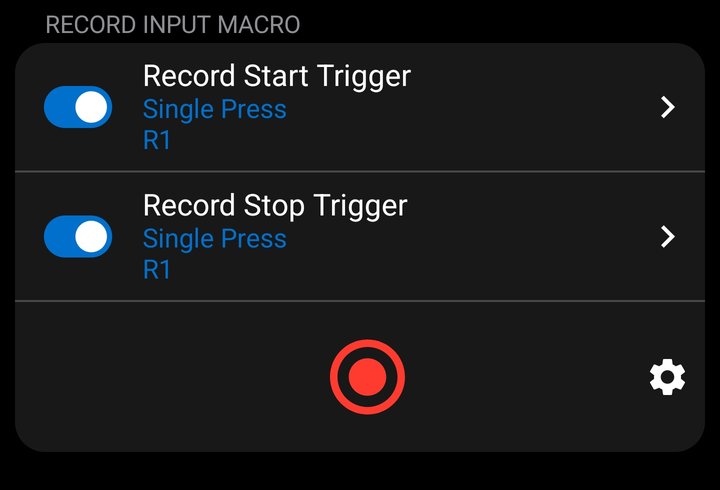
- Record Start Trigger — Starts recording inputs.
- Record Stop Trigger — Stops recording inputs.
- Macro Start Trigger — Starts playing the recorded macro.
- Macro Stop Trigger — Stops playback.
Each trigger can be enabled or disabled independently using the toggle next to it. Tap the trigger row to open the Trigger Configuration screen where you can choose the trigger action and the input to listen for. The Record Start and Record Stop triggers use controller inputs (Single Press, Double Press, Hold, Release, Two-Button Combo). The Macro Start and Macro Stop triggers offer those actions plus Sound and Image. See the Trigger Actions section for details on each action.
Record/Playback triggers are saved across app sessions but only apply whenever you're on the Record Screen.
Passthrough for Recording
On the Record Screen, passthrough has additional behavior related to whether the trigger input gets recorded into the macro.
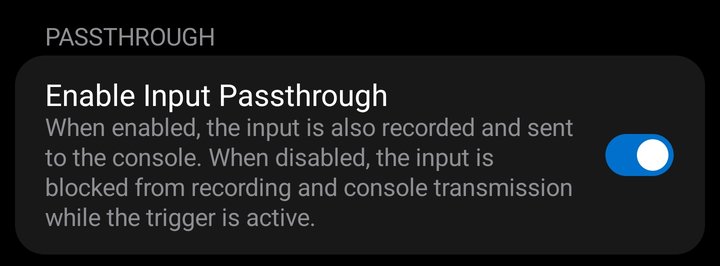
Record Start Trigger:
- Passthrough Enabled — The input is sent to the console and recorded into the macro.
- Passthrough Disabled — The input is blocked from both console transmission and recording while the trigger is active. The trigger input will not appear in the recorded macro.
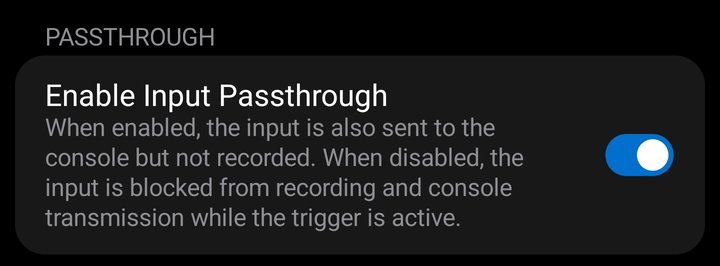
Record Stop Trigger:
- Passthrough Enabled — The input is sent to the console and recorded into the macro. It is captured as the recording's final entry.
- Passthrough Disabled — The input is blocked from both console transmission and recording while the trigger is active.
Macros Screen
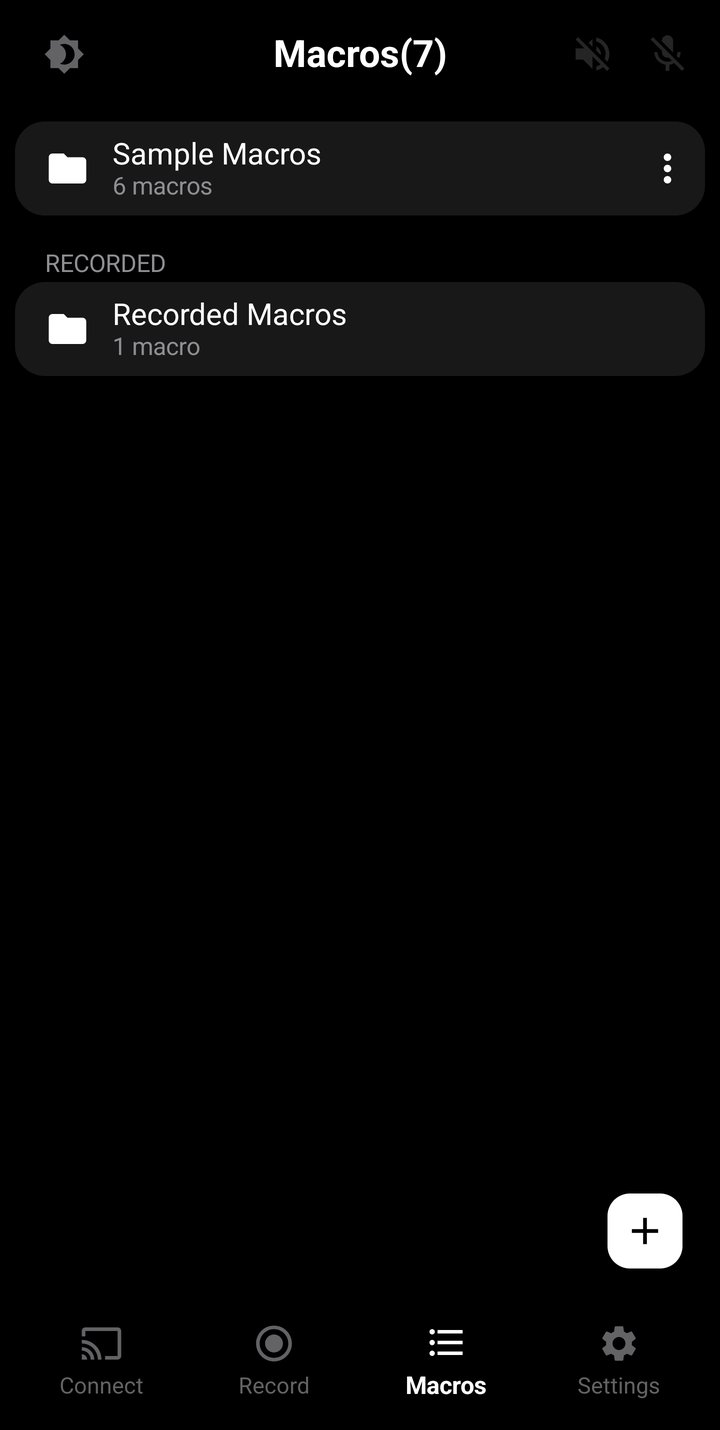
The Macros Screen is where you manage all your saved macros. It uses a folder-based layout — the main view shows your folders, and tapping a folder opens the list of macros inside it.
Folders
Macros are organized into folders. There are two types:
- User folders — Created by you. Can be renamed, copied, reordered, and deleted. Up to 20 user folders allowed.
- Recorded Macros folder — A permanent system folder, and the default destination for recordings saved from the Record Screen. It cannot be renamed, moved, or deleted.
Tap the + button to create a new folder. Each folder row shows the folder name and the number of macros it contains.
User folders have a 3-dot menu with the following options:
- Rename — Change the folder name (up to 40 characters).
- Copy — Duplicate the folder and all its macros into a new folder.
- Move Up / Move Down — Reorder the folder in the list.
- Delete — Delete the folder and all macros inside it. This action cannot be undone.
Managing Macros
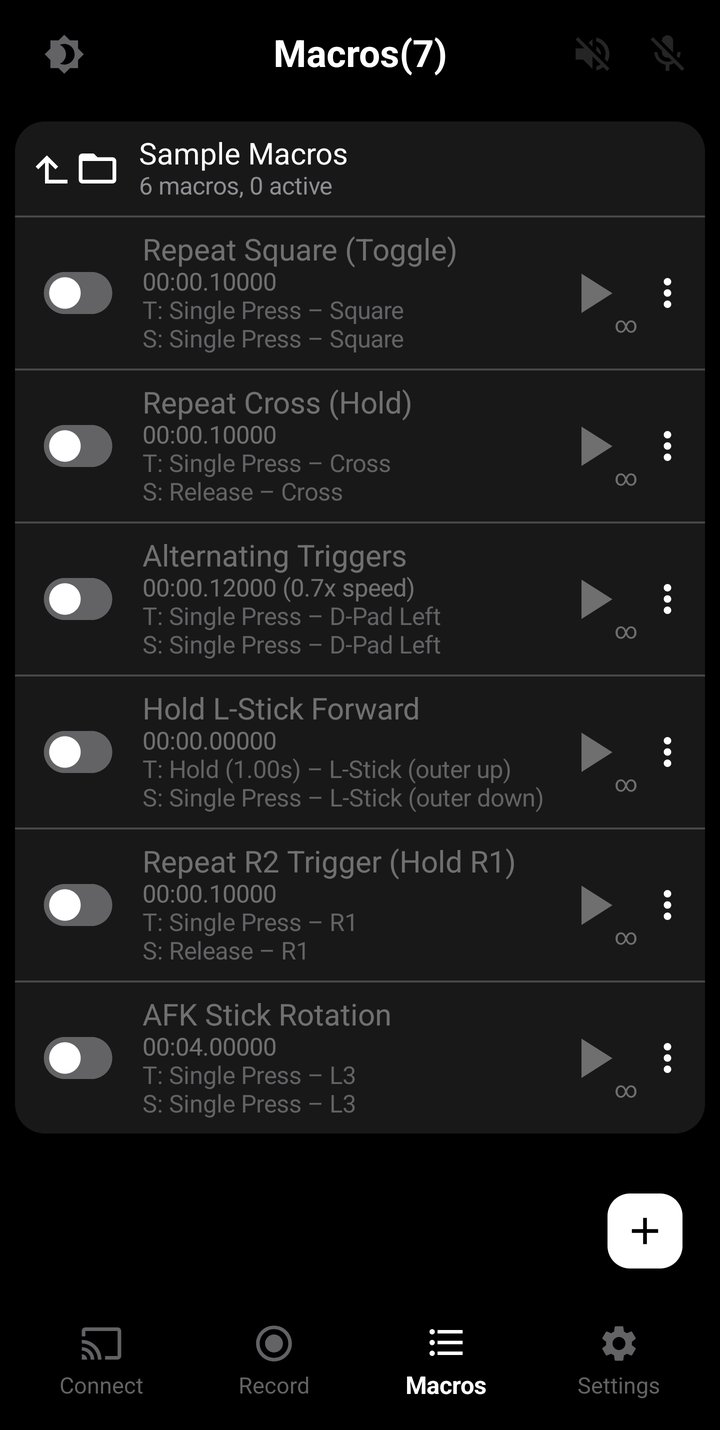
Tap a folder to view its macros. Each macro row shows:
- Active toggle — A switch on the left to activate or deactivate the macro.
- Name — The macro name.
- Duration — Total duration in MM:SS.sssss format. If playback speed is not 1.00x, the speed is shown next to the duration (e.g., "0.70x"). If Randomize Playback Speed is enabled, a ± is shown with it (e.g., "0.70x ±"), or on its own when the speed is left at 1.00x.
- Trigger summary — Start trigger (prefixed with "T:") and stop trigger (prefixed with "S:") are shown below the duration. The trigger description appears blue when the macro is active and the trigger is enabled, or gray otherwise.
- Play/Stop button — Tap to manually start or stop playback. A loop badge appears when looping is configured.
- 3-dot menu — Additional options (see below).
The 3-dot menu on each macro offers:
- Edit — Open the macro in the Macro Editor.
- Rename — Change the macro name.
- Copy To — Copy the macro to one or more folders.
- Move To — Move the macro to a different folder.
- Move Up / Move Down — Reorder within the folder.
- Export — Export the macro as a JSON file.
- Delete — Permanently delete the macro.
Playing Macros
A macro must be activated before it can be played or triggered during gameplay. Toggle the switch on the left side of the macro row to activate it. Play the macro by clicking the row or activating its start trigger. The macro will light up blue to indicate it is playing.
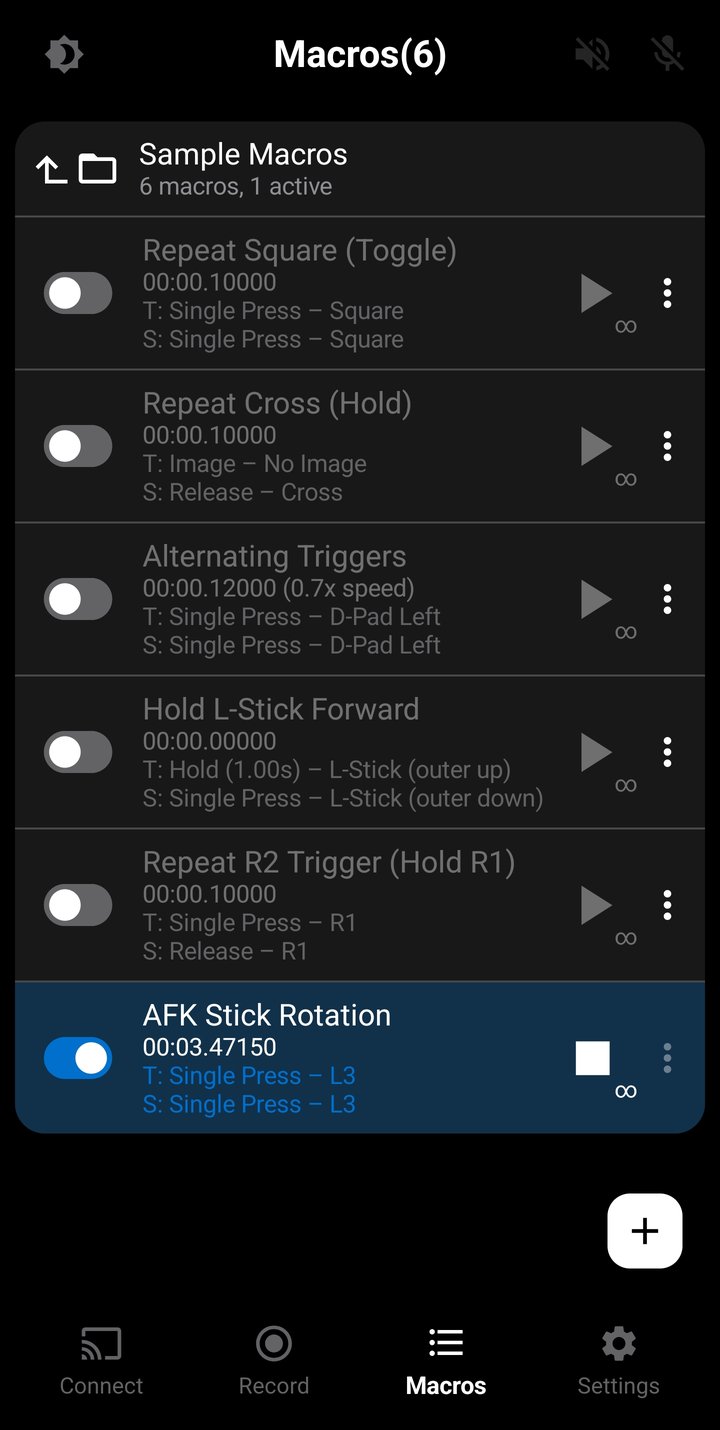
When a macro is activated:
- The macro data is loaded into memory for instant playback.
- Start and stop triggers (if configured and enabled) are armed and ready to detect input.
- The play button becomes available for manual playback.
Multiple macros can be played/triggered at the same time. Each macro adds inputs into a stack based system that resolves conflicts before sending the inputs over remote play. Raw controller inputs still work during macro playback and will resolve with macro inputs. If there is no active console connection, macros will still play through their duration but inputs are not sent anywhere.
The folder header shows the total number of macros and how many are currently active (e.g., "5 macros, 2 active"). Up to 10 macros per folder can be active at the same time — the limit applies to each folder independently, so different folders can each have their own active macros. See Limits for details.
Active macros only listen for their triggers while their folder is open. When a macro is deactivated, it is unloaded from memory and its triggers stop listening for input.
Macro Triggers
Each saved macro has its own independent start trigger and stop trigger. These are configured per-macro and work while the macro is active on the Macros Screen.
- Start trigger — Starts playback of the macro. Only fires when the macro is active and not already playing.
- Stop trigger — Stops playback. Only fires when the macro is currently playing.
To configure triggers, tap the Edit option from the macro's 3-dot menu to open the Macro Editor, then tap the trigger rows at the top. See Trigger Actions for input-based actions, Sound Triggers for audio-based triggers, or Image Triggers for image-based triggers (Pro tier).
Multiple active macros can have identical triggers, allowing you to control several macros collectively during gameplay. For example, you could have two macros triggered by R1 single press.
Copy & Move
Copy To creates a duplicate of the macro in one or more folders. A dialog appears with checkboxes for each folder — select the folders where you want copies to be placed and enter a name for the copy. The original macro is not affected.
Move To moves the macro to a different folder. Select the target folder from the list. If the macro is currently active, it will be automatically deactivated before moving.
Export & Import
Macros can be exported as JSON files and imported on another device or shared with other users.
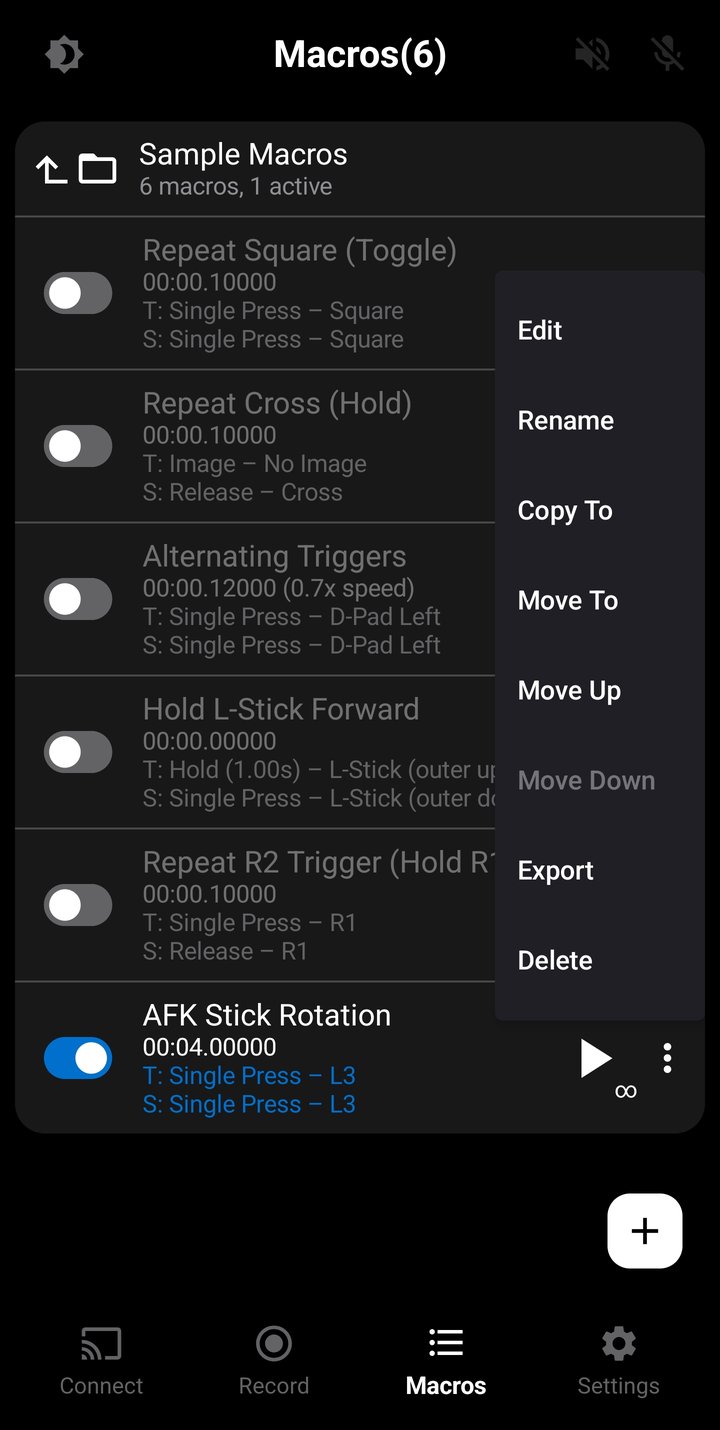
Exporting: Tap Export from the macro's 3-dot menu. Choose the stick value format:
- Raw X, Y — Stick positions as raw coordinate values (-32768 to 32767).
- Angle, Tilt — Stick positions as angle (0–359 degrees) and tilt (0–100 percent), which is easier to read and edit manually. Note that angle and tilt values are rounded to whole numbers and lose some accuracy from the raw coordinates. Re-importing may produce slightly different x, y values.
The exported JSON file includes all macro metadata (name, duration, triggers, playback speed, loop settings) and every input entry with timestamps. You can save it to any location on your phone or share it directly.
Importing: Tap the + button on the Macros Screen and choose Import Macro. Select a JSON file from your device. The app validates the file format, checks that it's compatible, and imports the macro into the current folder.
Exported JSON files are human-readable and can be edited in a text editor. This is useful for creating precise macros by hand or making bulk adjustments that would be tedious in the app's editor.
Editing Macros
The Macro Editor lets you view and modify every detail of a saved macro. Open it by tapping Edit from the macro's 3-dot menu on the Macros Screen.
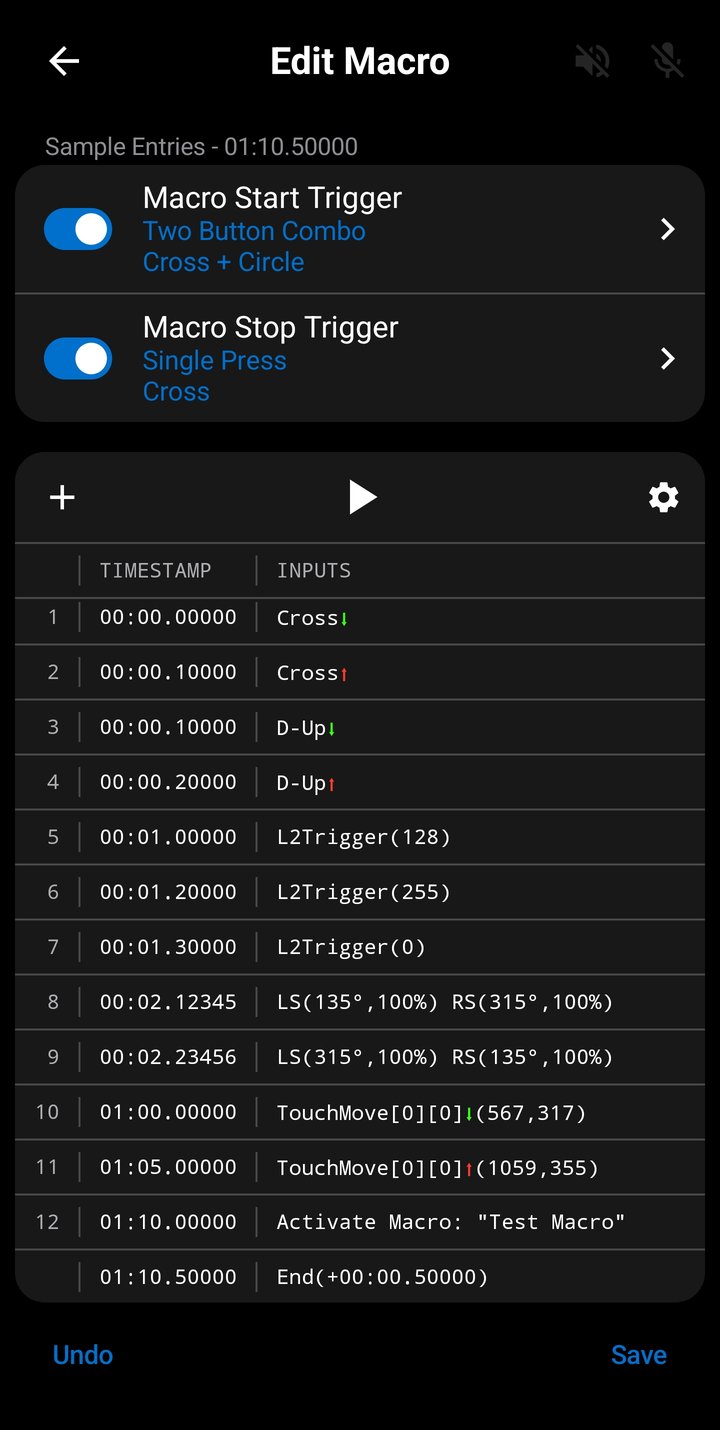
The editor screen has the trigger configuration at the top, the playback toolbar below it and a scrollable list of all entries. Each entry represents a single command at a specific point in time.
Entry List
The entry list displays every command in chronological order. Each row shows:
- Row number — Sequential 1-indexed position in the list.
- Timestamp — When the command should execute, in MM:SS.sssss format (minutes, seconds, and five sub-second digits representing 0.01ms precision).
- Inputs — What command should execute. The format depends on the type:
- Buttons: (Cross, Circle, Square, Triangle, D-Up, D-Down, D-Left, D-Right, L1, R1, L3, R3, Options, Share, TouchButton, PS Button). Button name with a colored arrow — green down arrow for press, red up arrow for release (e.g., "Cross" with a green arrow).
- Triggers: (L2, R2). Trigger name and analog value, 0–255 (e.g., "L2 Trigger (128)").
- Sticks: (L-Stick, R-Stick). Left and right stick positions displayed as either raw X,Y coordinates or angle/tilt, depending on the display setting (e.g., "LS(135°,100%) RS(315°,100%)").
- Touchpad: Touch move event with slot, touch ID, up/down state and position.
- Macros: Activate/deactivate and target macro name (e.g., Activate Macro: "Test Macro").
At the bottom of the list is the End marker, which shows the total macro duration including the end delay. The end delay is added to the last entry timestamp.
You can add new entries using the + button in the playback toolbar.
Long-press any entry row to Cut, Copy, Paste here, Paste at original time, or Delete. Paste here inserts the clipboard entry at the long-pressed row's timestamp; Paste at original time uses the timestamp the entry had when it was copied or cut. The clipboard is shared across macros — copy from one macro and paste into another.
Editing Controller Input Entry
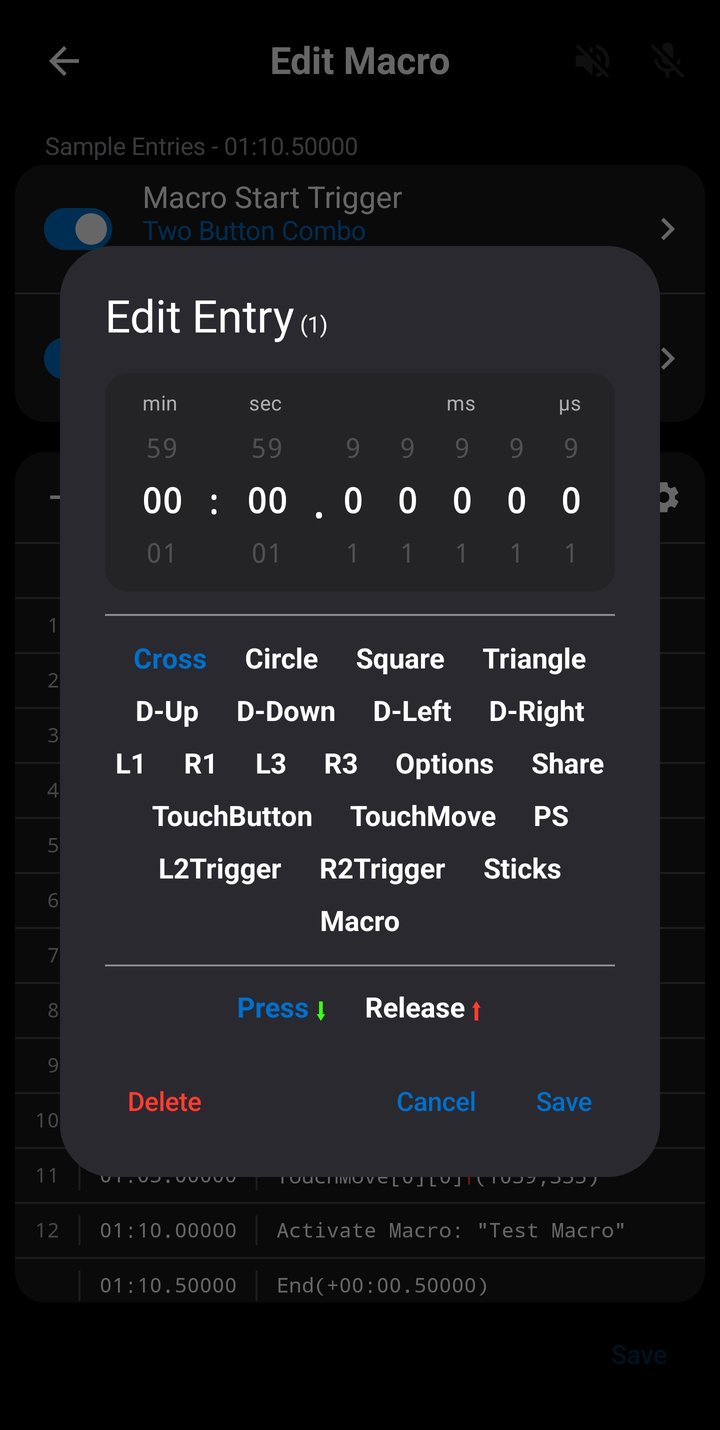
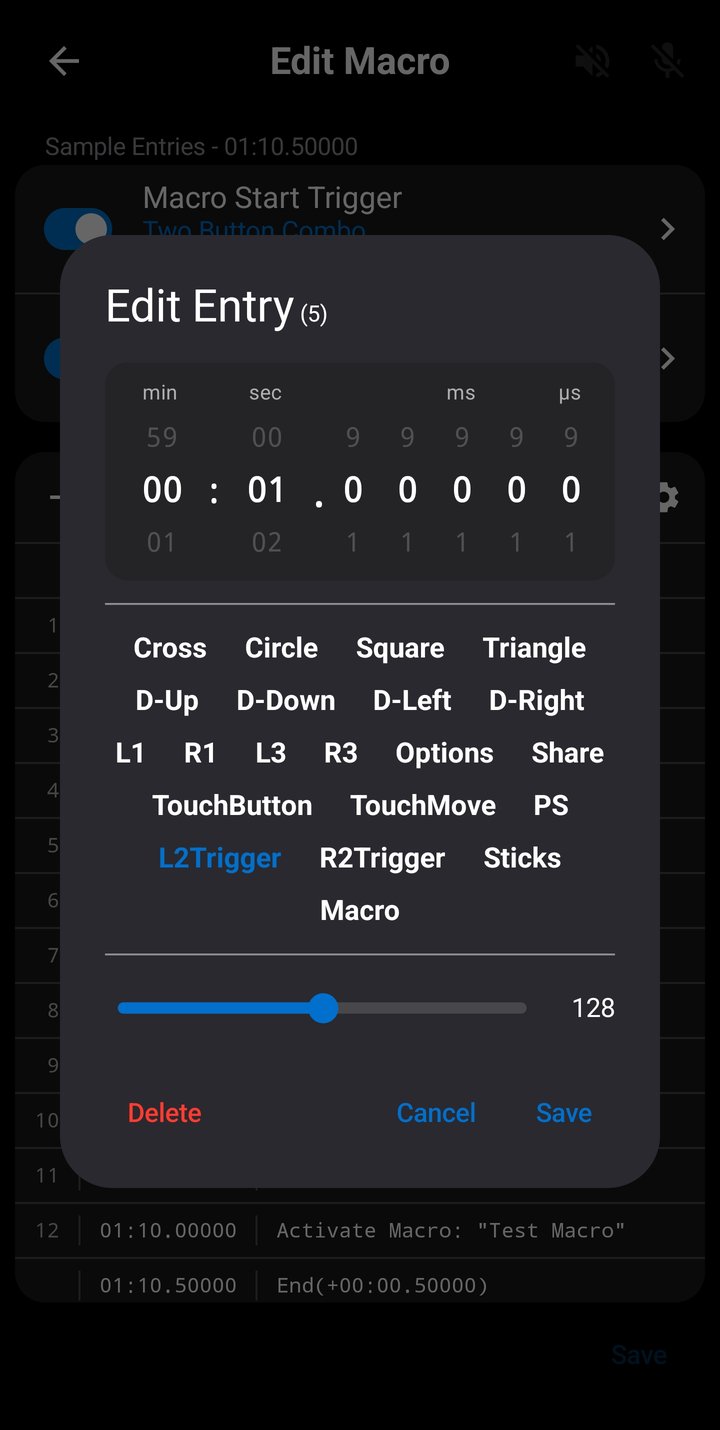
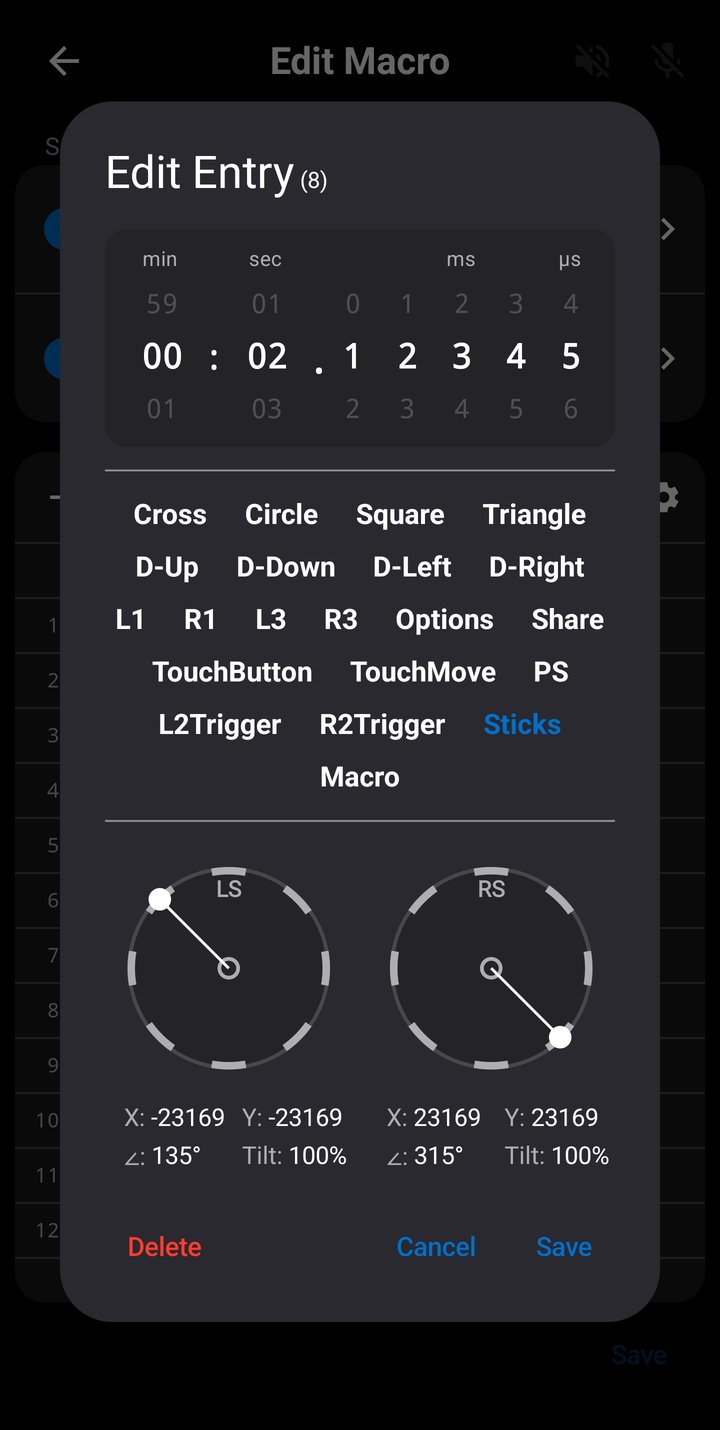
Tap any entry row to open the Entry Editor dialog. Here you can modify:
- Timestamp — Adjust when the command occurs using minute, second, and sub-second digit pickers. Tap any digit to type an exact value.
- Input Types — Change between Buttons, Trigger (L2/R2), Sticks (Left/Right), and Touchpad movement.
- Input Values — Depending on the type:
- Buttons: Toggle between press and release state.
- Triggers: Drag a slider to set the analog value (0–255).
- Sticks: Drag on circular pads to set left and right stick positions. Snap markers at the 8 cardinal and diagonal directions let you tap to snap to full tilt in that direction. A small circle in the center snaps back to neutral (0, 0). Positions are otherwise clamped to the stick's circular boundary.
- Touchpad Move: Set touch slot, ID, down/up state, and X/Y coordinates.
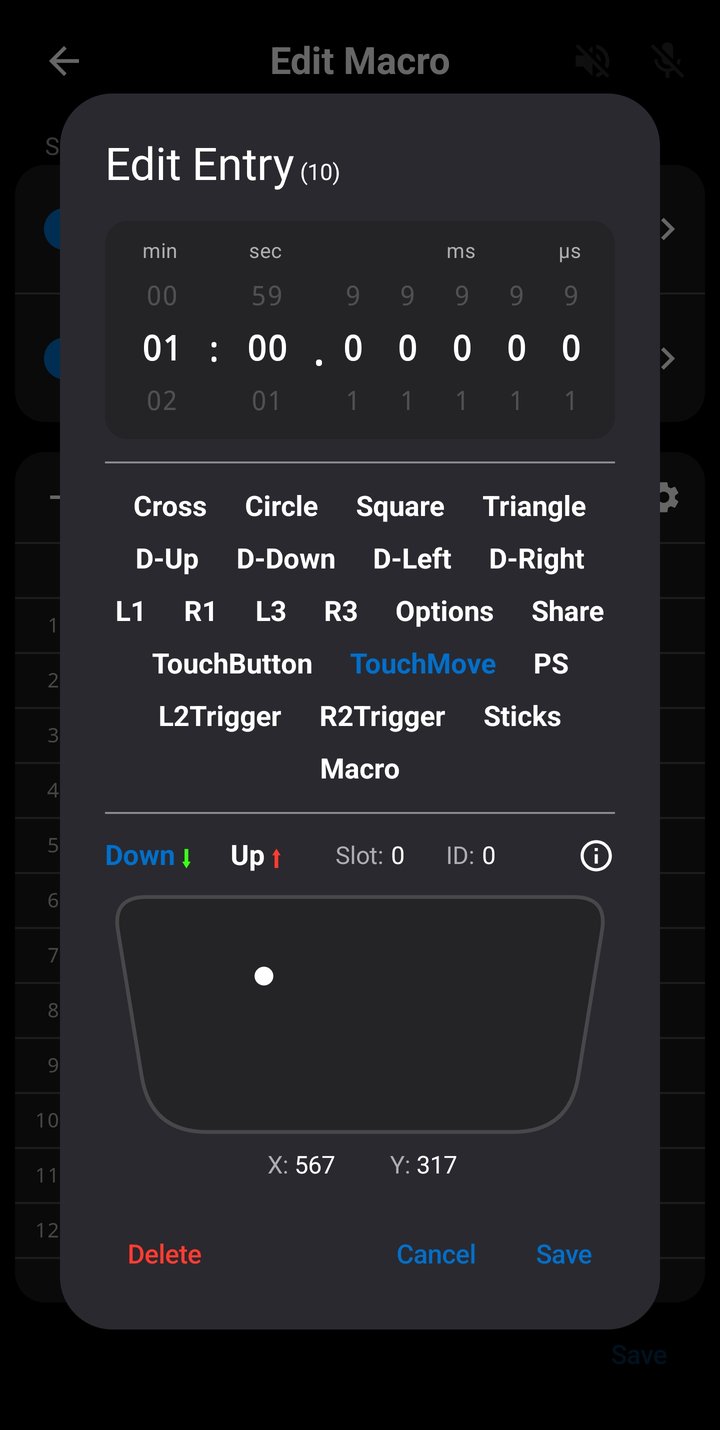
Editing Macro Entry
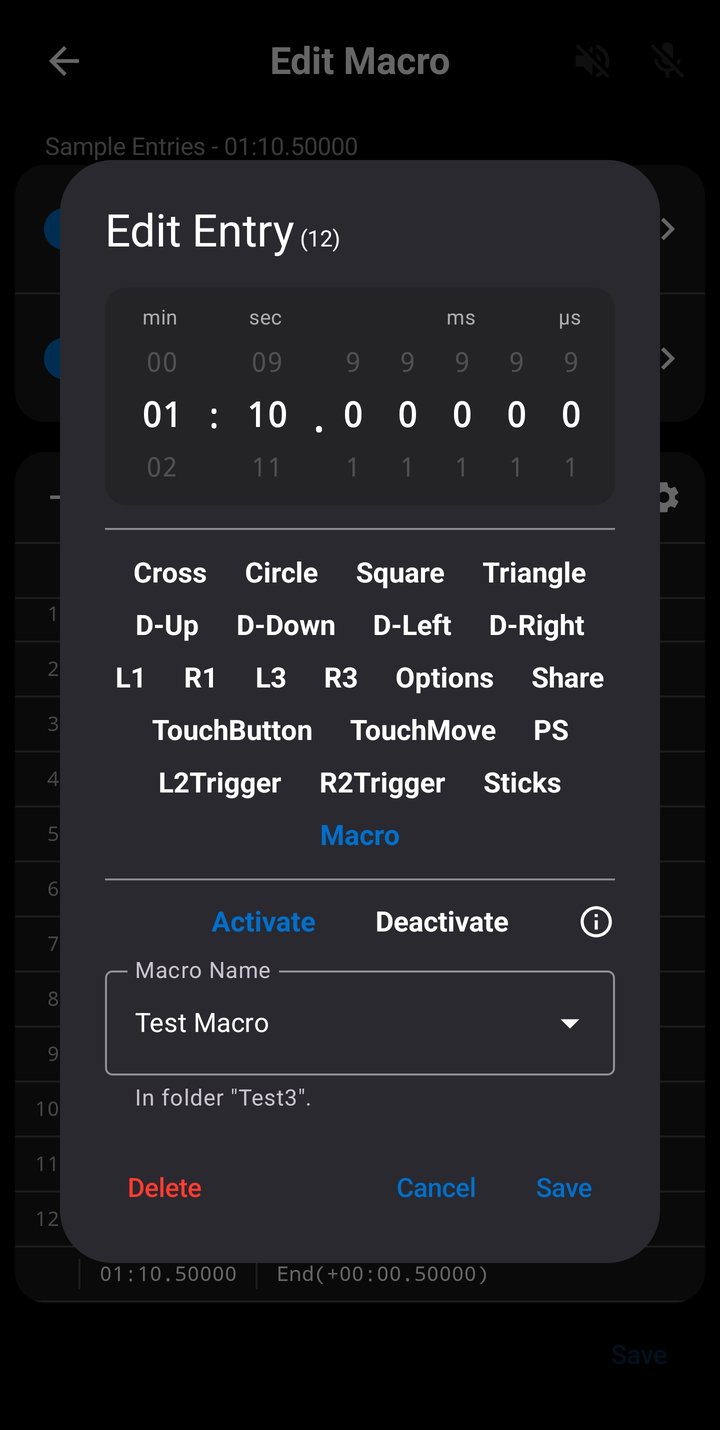
Besides controller inputs, an entry can be a Macro command. Instead of sending a controller input, it activates or deactivates another macro at its timestamp. In the Entry Editor, select Macro as the type, then set:
- Action — Activate or Deactivate.
- Macro name — the target macro. Pick from the dropdown of other macros in the same folder, or type a name directly.
When playback reaches the entry, it flips the target macro's on/off toggle on the Macros Screen — the same toggle you tap by hand. Activate arms the target so its triggers start listening (it does not start playing it); Deactivate disarms it, and stops it if it is currently playing.
This lets you chain macros together, which is especially useful with Sound and Image triggers. For example, a macro can deactivate itself after it fires, or activate the next macro in a sequence.
The target must be in the same folder as this macro. If several macros share the same name, the command toggles all of them. A macro entry command cannot toggle the macro it belongs to. To make a macro switch itself off after it finishes, use Deactivate on Completion in Playback Options instead. Activating is still subject to the limit of 10 active macros per folder.
End Delay
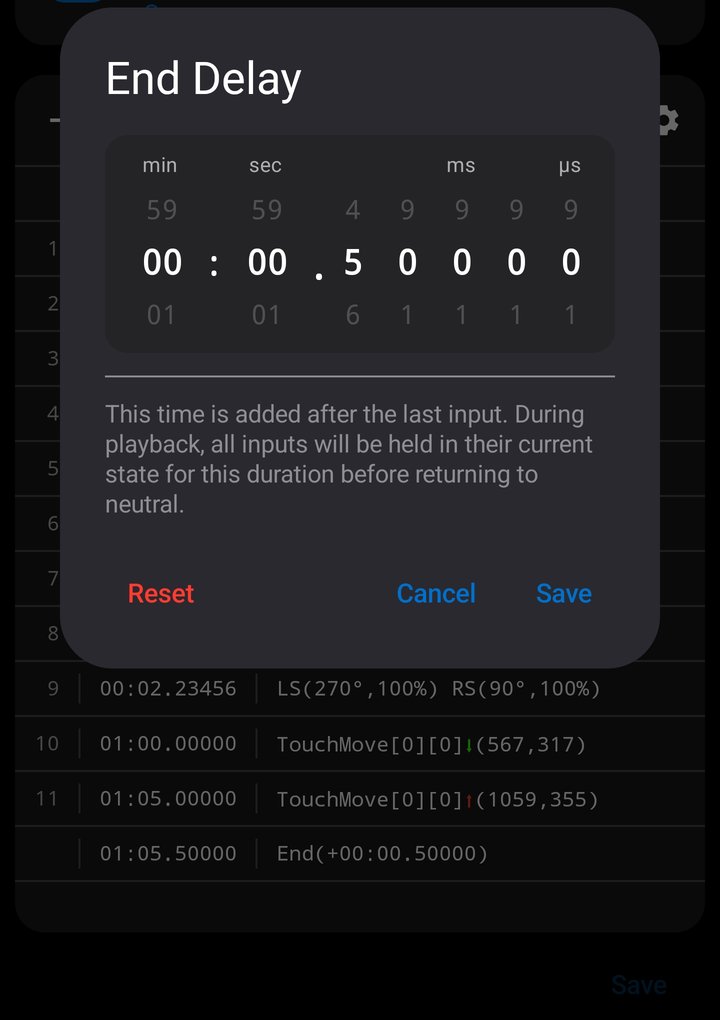
The End Delay is the time between the last entry and the end of the macro. It controls how long the final input states are held before the macro completes (or loops to the beginning).
For example, if your only entry is a button press at 0.50s and the end delay is 0.50s, the macro will hold that button pressed state for an additional 0.50 seconds before finishing, making the total duration 1.00s. Once the macro terminates after the end delay, all controller inputs are reset to their neutral states.
Tap the End row at the bottom of the entry list to adjust the end delay. The dialog includes a Reset button that sets the delay back to zero.
Long-press the End row to Paste a clipboard entry at the end of the macro, or to Reset the end delay.
Triggers
The trigger configuration rows appear above the entry list. Each macro has a Start Trigger and a Stop Trigger, each with an enable/disable toggle.
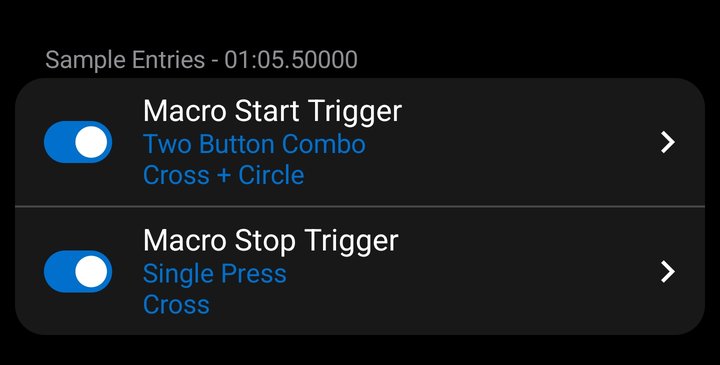
Tap a trigger row to open the full Trigger Configuration screen where you can select the trigger action, input, and options. See Trigger Actions for input-based actions, Sound Triggers for audio-based triggers, or Image Triggers for image-based triggers (Pro tier). Changes are reflected immediately — you can test triggers during playback in the editor.
Playback Options
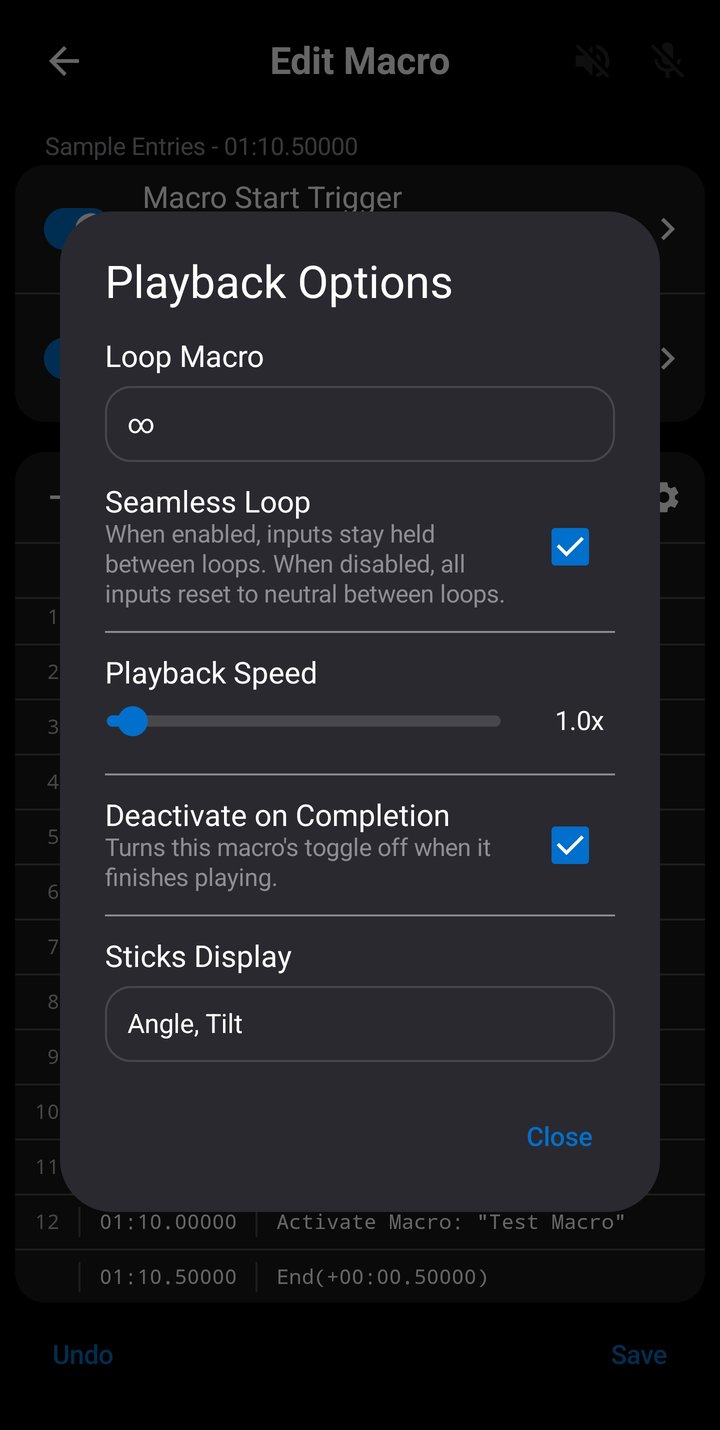
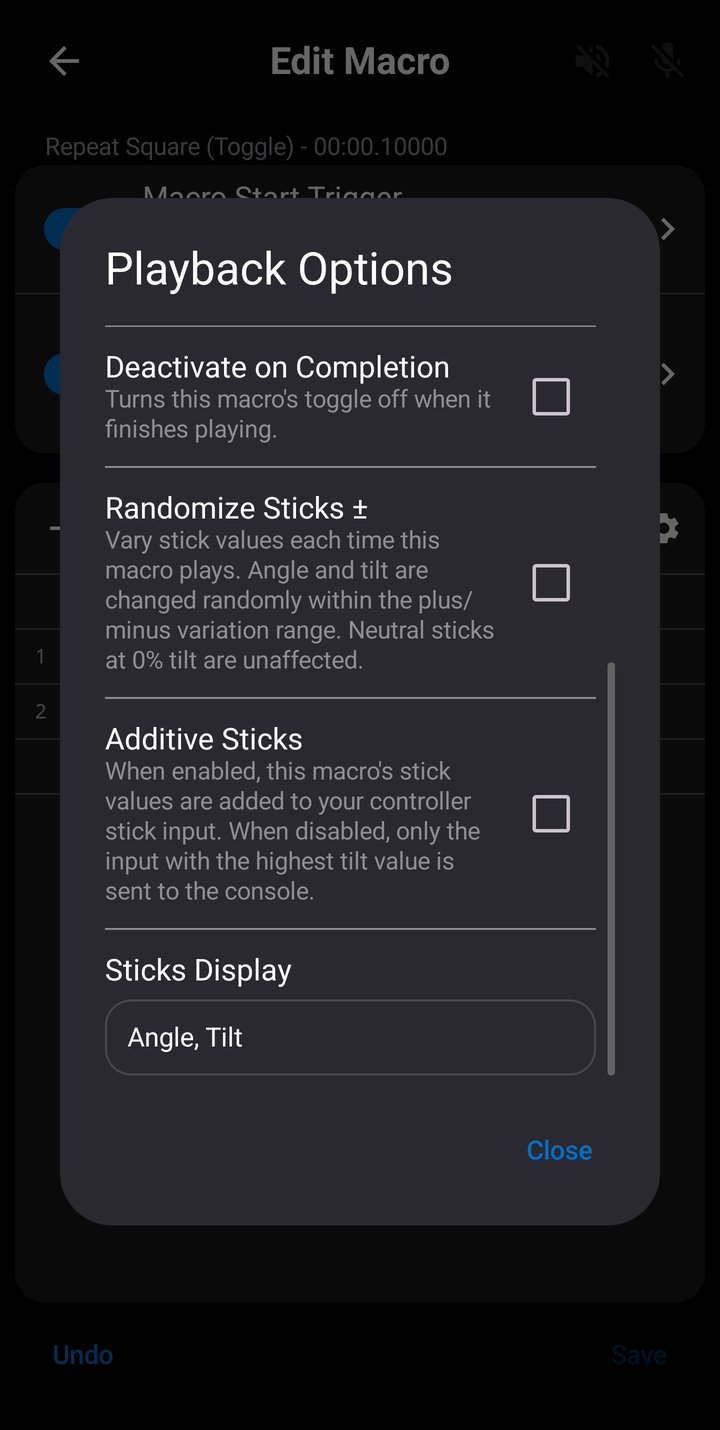
The playback toolbar at the top of the editor lets you play the macro. Tap the Play button to start playback; the entry list and all editing controls are disabled while playing so you can focus on the output.
Tap the gear icon in the playback toolbar to open the Playback Options dialog, which includes:
- Loop count — Off, x2 through x10, or infinite.
- Seamless loop — Toggle continuous looping without input reset between iterations.
- Playback speed — 0.10x to 10.00x in 0.01x steps, with a slider and click-to-type input.
- Randomize Playback Speed — Vary the macro's playback speed randomly each time it plays. See Randomize Playback Speed below.
- Deactivate on completion — When enabled, the macro turns its own toggle off once it finishes playing. So a sound or image triggered macro fires once and then stops re-firing. It only toggles off on true completion — after all loops and the end delay have finished; an individual loop does not count as completion. A macro set to loop infinitely never completes, so it never toggles itself off.
- Randomize Sticks — Vary the macro's stick values randomly each time it plays. See Randomize Sticks below.
- Additive Sticks — Add the macro's stick values on top of your controller input instead of the two competing. See Additive Sticks below.
- Stick Sensitivity — Scale your own controller stick input per direction while the macro plays. See Stick Sensitivity below.
- Stick display format — Switch between raw X,Y coordinates and angle/tilt for how stick entries are shown in the list.
When playback speed is not 1.00x, the current speed is displayed next to the Play button (e.g., "0.70x"). When looping is configured, a badge shows the loop count or infinity symbol.
The stick display format is a global setting and is not saved per-macro.
Randomize Playback Speed
Makes a macro run at a slightly different speed on every playback instead of always running at the same one.
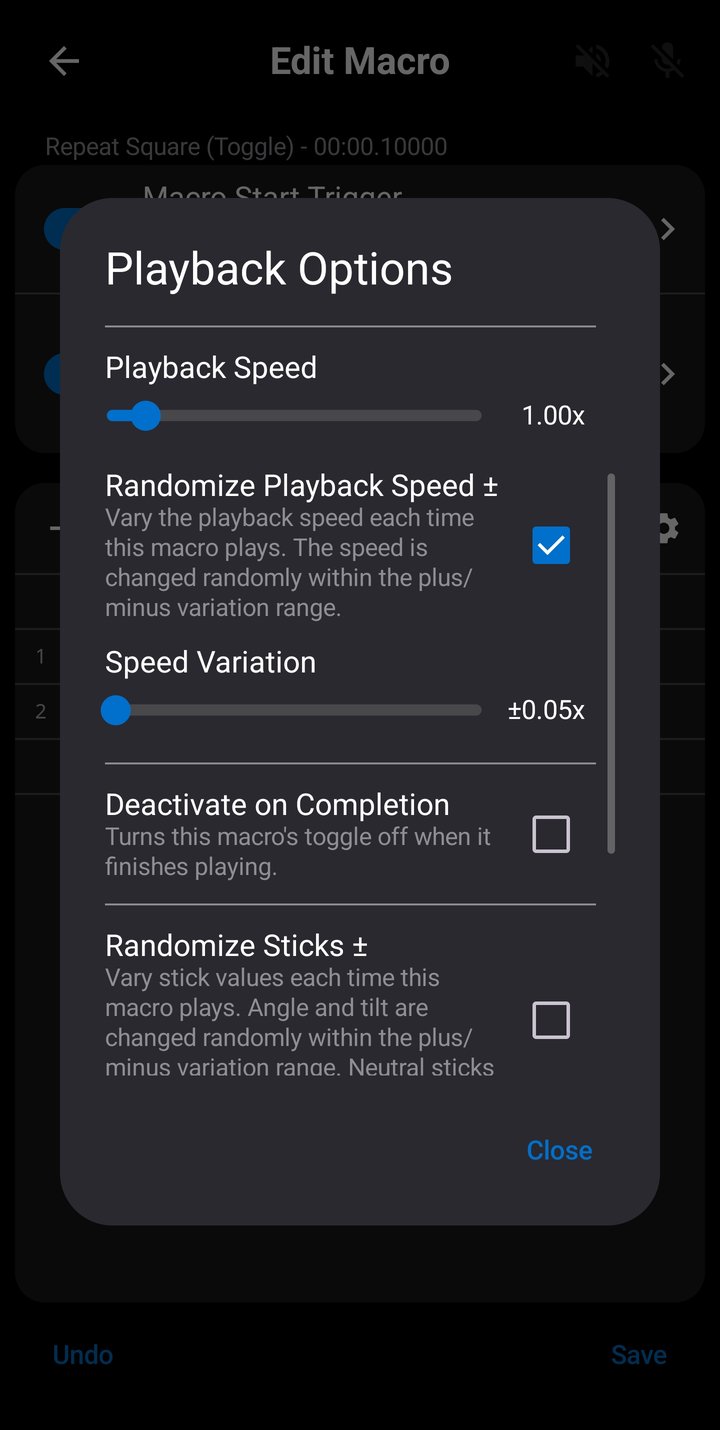
Enable the Randomize Playback Speed checkbox in the Playback Options dialog to reveal one control:
- Speed Variation — How far the speed can shift, from ±0.01x to ±5.00x, defaulting to ±0.05x. Tap the value to type an exact number.
One speed is picked per playback and applied to the whole run, then a fresh speed is picked for each replay and for each loop iteration. The macro never changes tempo partway through; each run is played at a single consistent speed.
The result always stays within the 0.10x to 10.00x playback range, and the variation is limited by whichever end it reaches first. A macro set to 0.20x with ±0.50x variation cannot go below 0.10x, so it varies between 0.10x and 0.70x rather than evenly either side of 0.20x. Keep the base speed away from the ends of the range if you want the variation to be even in both directions.
When the randomizer is on, a ± is shown after the speed next to the Play button in the editor, and next to the macro's duration on the Macros Screen. If the playback speed is left at 1.00x the ± appears on its own, so a macro that only randomizes is still marked.
The setting is saved per-macro and is configured in the Macro Editor only. Macros saved from the Record screen have the setting disabled by default.
Randomize Sticks
Makes a macro's stick movements vary slightly on every playback instead of repeating the exact same values.
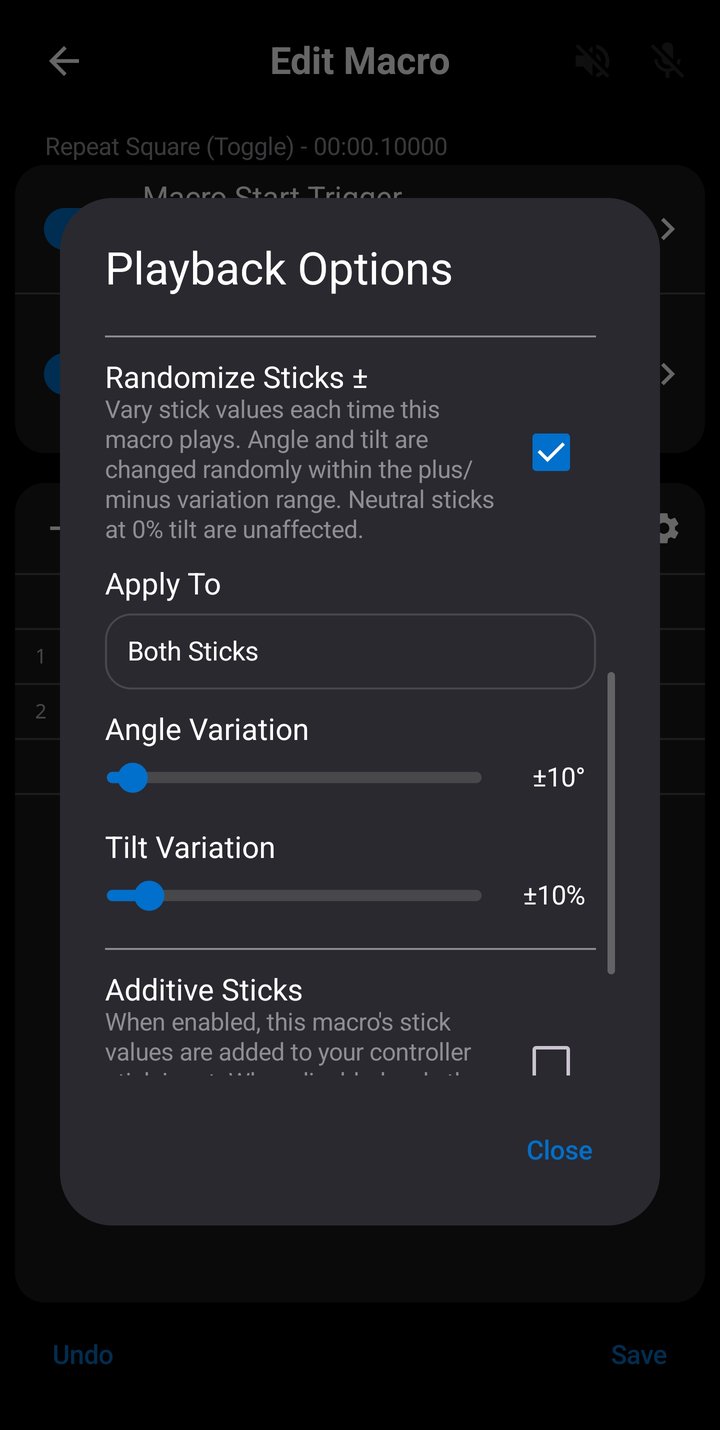
Enable the Randomize Sticks checkbox in the Playback Options dialog to reveal three controls:
- Apply To — Which stick is varied: Both Sticks, Left Stick Only, or Right Stick Only. Use a single stick when the other one has to stay exact, for example a left stick held at a precise angle to run a corridor while the right stick varies.
- Angle Variation — How far the direction can shift, from ±0° to ±180°, defaulting to ±10°. At ±180° the direction is completely random. The angle wraps around the full circle rather than stopping at either end, so a stick pointing at 355° shifted by +20° comes out at 15°.
- Tilt Variation — How far the deflection can shift, from ±0% to ±99%, defaulting to ±10%. Tilt is limited to the stick's own range, so a shift can never take it below 0% or above 100%.
Tap either slider's value to type an exact number. Setting a slider to 0 leaves that value unchanged, which is how you vary only the angle or only the tilt.
One random variation offset is picked per playback and applied to every stick entry in the macro, then a fresh offset is picked for each replay and for each loop iteration. Applying a single offset across the whole macro preserves its shape: a recorded path is rotated and scaled as a whole rather than each entry being jiggled independently, so the movement still looks like the one you recorded. Each stick rolls its own offset, so with Both Sticks selected the two vary independently within the same ranges.
Two behaviors worth knowing:
- Neutral sticks are never touched. A stick resting at 0% tilt has no direction to vary, so it is left centered. The randomizer varies the stick movements a macro already makes and never creates movement where the macro had none.
- Tilt can reach 0%. When the variation range reaches down to zero, a playback can roll a tilt of 0, which centers that stick for the whole run.
In the editor's entry list, a ± is shown after each stick value the randomizer will vary, for example "LS(45°,60%)± RS(315°,100%)" with Apply To set to Left Stick Only. A stick resting at 0% tilt is never marked, since it is never varied, and if both variation sliders are set to 0 no marks appear at all. The marks show what the randomizer will actually touch, so they are a quick way to confirm a macro is set up the way you intended before playing it.
The setting is saved per-macro and is configured in the Macro Editor only. Macros saved from the Record screen have the setting disabled by default.
Additive Sticks
Adds a macro's stick values on top of other sources that are also moving the stick, such as other macros or controller input.
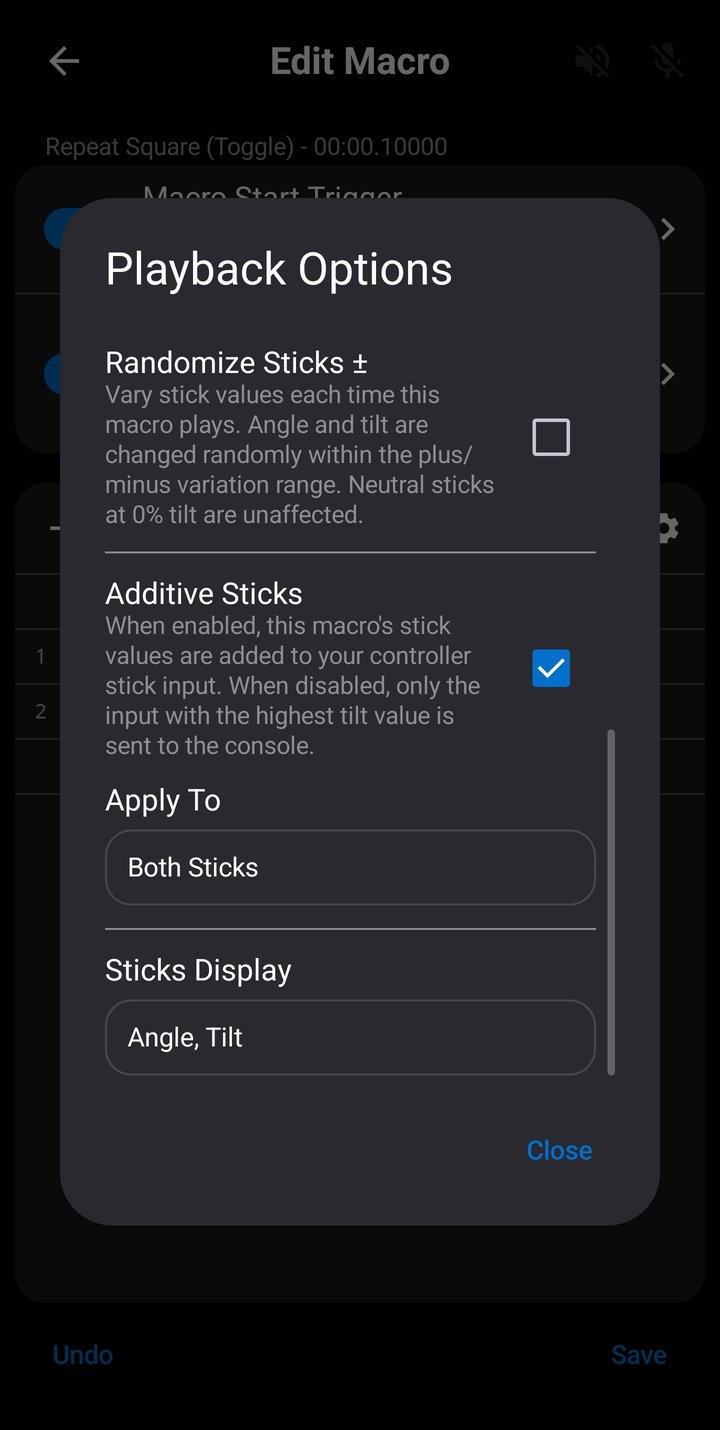
Normally every source of stick movement competes and the one with the highest tilt value is sent to the console. The app compares the tilt of your controller stick against the tilt of every macro currently playing, sends the highest one to the console, and discards the rest. So a macro tilted further than your stick overrides your input completely, and a macro tilted less than your stick is ignored completely. If two sources are tied for the highest tilt, the controller stick always wins.
With Additive Sticks enabled, that macro stops competing. Its stick values become an offset that is added to whatever the winning source is doing, rather than a position that replaces it.
Enable the Additive Sticks checkbox in the Playback Options dialog to reveal one control:
- Apply To — Which stick is added: Both Sticks, Left Stick Only, or Right Stick Only.
Values are added as directions, not as tilt numbers. Two movements pointing the same way add together, two pointing opposite ways subtract from each other, and two at right angles combine into a diagonal pointing between them. A macro pushing the stick down at 25% against your stick held up at 10% gives 15% down; the same macro against your stick held right at 10% gives a diagonal down and to the right.
This is not limited to your controller input. Every source moving a stick takes part. Two additive macros playing at once are both added, so their offsets stack, and if they point in opposite directions they cancel each other out.
Everything is added together first and the total is limited to the stick's range only once, at the end, so the order the macros started in never changes the result. Also a stick cannot travel outside its own circular range, so a total past 100% is brought back to the edge with its direction unchanged. An offset added to a stick that is already fully deflected is therefore partly or entirely absorbed.
Apply To chooses which stick is added. It does not silence the other one — a macro set to Right Stick Only still sends its left stick values normally, competing for the left stick in the usual way.
Deadzone, clamp, invert and disabled axes are applied to your controller stick only, never to a macro's values. A controller movement small enough to fall inside the deadzone is discarded before anything is added, so the macro's offset then drives the stick on its own.
In the editor's entry list, an A is shown after each stick value that will be added, for example "LS(270°,25%)A RS(90°,40%)" with Apply To set to Left Stick Only. A stick resting at 0% tilt is never marked, since adding nothing changes nothing. If Randomize Sticks is enabled on the same macro both marks appear together, as "LS(270°,25%)±A".
The setting is saved per-macro and is configured in the Macro Editor only. Macros saved from the Record screen have the setting disabled by default.
Stick Sensitivity
Adjust controller stick sensitivity separately in each of the four directions, while a macro is playing.
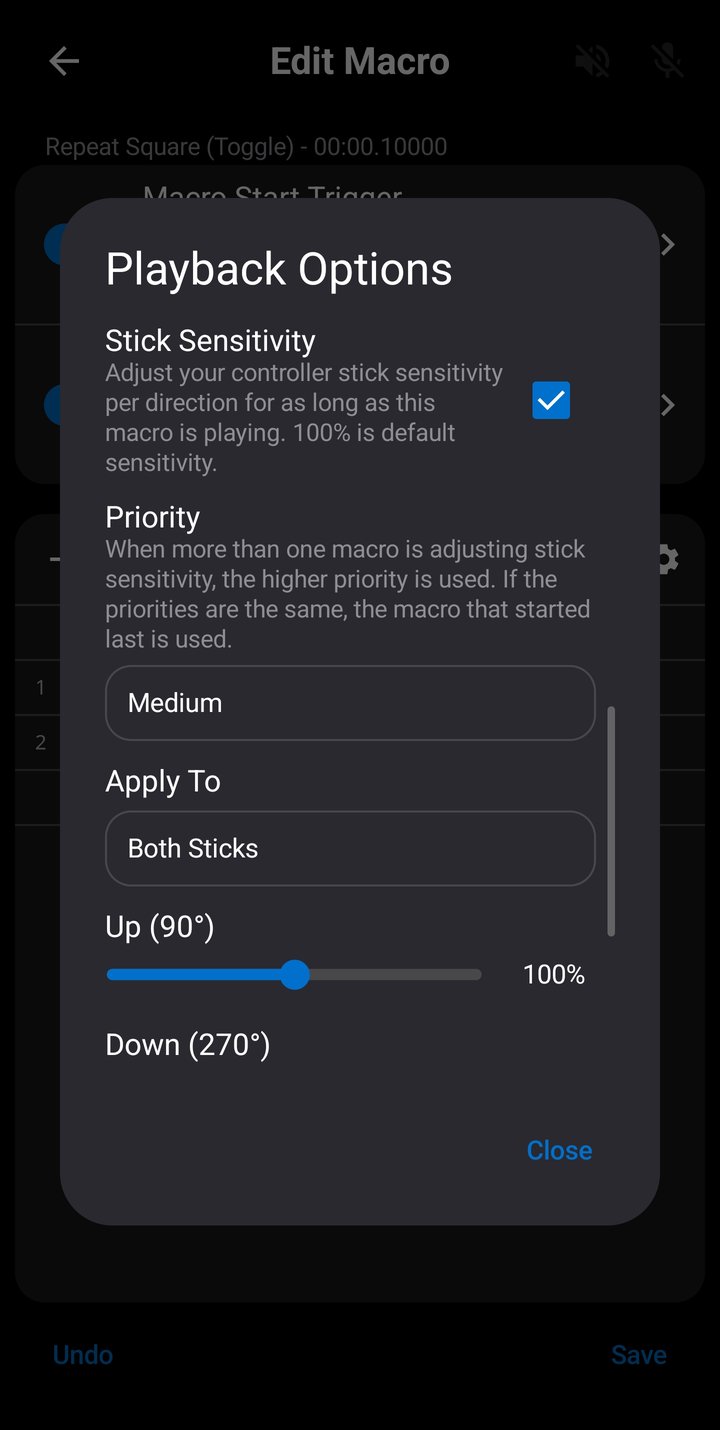
Enable Stick Sensitivity in the Playback Options dialog to reveal these controls:
- Priority — Which macro's sensitivity is used when more than one is playing: Low, Medium or High.
- Apply To — Which stick is affected: Both Sticks, Left Stick Only, or Right Stick Only.
- Up (90°), Down (270°), Left (180°) and Right (0°) — Four sliders, from 0% to 200%, each scaling controller stick sensitivity independently in each direction. Tap a value to type an exact number.
At 100% stick sensitivity is default. At 0% stick movement is completely removed. At 200% stick sensitivity is doubled. The setting changes your controller stick input only and applies for as long as the macro is playing. A macro's own stick entries are never scaled.
The four directions are independent, so lowering Down (270°) leaves upward and sideways movement untouched. Setting two directions to different values also changes the direction of a diagonal movement, because each half of it is scaled separately.
The sliders follow Apply To, so a macro set to Right Stick Only never changes your left stick input.
Priority determines which macro's stick sensitivity setting takes precedence when playing. Only one macro sets the stick sensitivity at a time. If several macros with the setting enabled are playing on the same stick, the one with the highest Priority is used, and all four of its directions apply together. If two macros have the same priority, the one that started most recently is used. When that macro stops, the next one takes over, and when none are left the sensitivity returns to 100%.
A macro with the setting disabled, is never counted in the Priority comparison. A macro with the setting enabled, applies stick sensitivity in all four directions, including any values left at 100%, so it holds those directions at 100% against a lower-priority macro that lowers them.
Stick Sensitivity works whether Additive Sticks is enabled or not, but the two combine differently. With Additive Sticks enabled, your scaled controller stick input is added to the macro's stick values, so lowering a direction reduces how much of your own movement is blended into the total. With Additive Sticks disabled, the two compete and only the higher tilt is sent to the console, so lowering a direction makes your input lose that comparison more often rather than blending with it. A controller stick pushed to 40% with the slider at 50% is sent as 20%, so a macro tilted further than 20% now overrides it completely. Raising a slider above 100% works the other way, letting your input win comparisons it would otherwise lose.
Deadzone and clamp are applied to your controller stick before the sensitivity, so a movement small enough to fall inside the deadzone is discarded first.
The setting is saved per-macro and is configured in the Macro Editor only. Macros saved from the Record screen have the setting disabled by default.
Macros with no entries can be used for applying a stick sensitivity change without sending any input.
Undo & Redo
All edits in the Macro Editor can be undone and redone. This includes adding, deleting, and modifying entries, changing the end delay, toggling triggers, modifying trigger configurations, and changing playback settings.
Undo and Redo buttons appear at the bottom of the screen when there are actions to reverse or reapply. Up to 50 levels of undo history are maintained.
The editor tracks whether you have unsaved changes. If you try to leave with unsaved changes, a dialog will ask whether you want to Save, Discard, or Cancel. The Save button in the editor is only enabled when changes have been made.
Trigger Actions
Triggers determine how macros start and stop during live gameplay. Both the Record Screen and saved macros support configurable start and stop triggers. Each trigger has an action (how to activate it) and one or more inputs (what to press).
Most trigger actions respond to controller inputs — single press, double press, hold, release, and two-button combo. The Sound and Image actions instead respond to console audio and video; they are summarized here, with full details in the dedicated Sound Triggers and Image Triggers sections below.
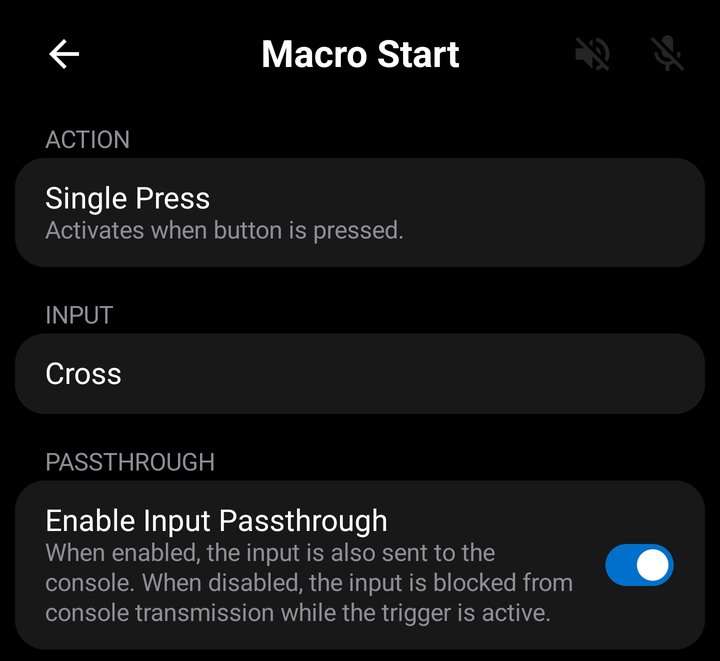
Single Press
Activates when you press the input.
For button the trigger fires on the transition from released to pressed — a single deliberate press.
For L2/R2 Triggers, the trigger fires when the value enters the lower and upper bound set for the input.
For sticks, the trigger fires when stick enters the selected zones.
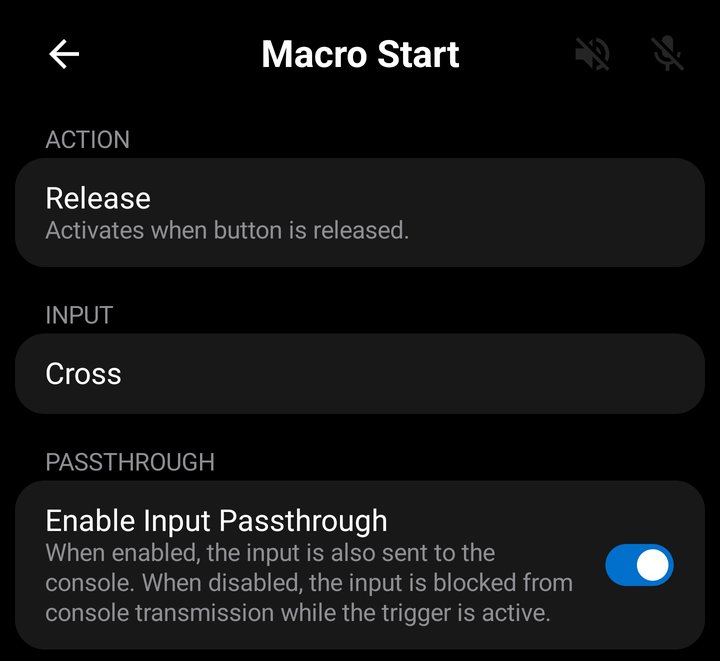
Release
Activates when you release the input after pressing it. The trigger fires on the transition from pressed to released.
For L2/R2 Triggers a release is considered a value of 0.
For sticks a release is considered when stick enters deadzone (X,Y value of 0).
Release is commonly used for stop triggers — for example, hold a button to play a macro, release the button to stop it. Combined with a Single Press or Hold start trigger on the same input, this creates a natural "hold-to-play" behavior.
Double Press
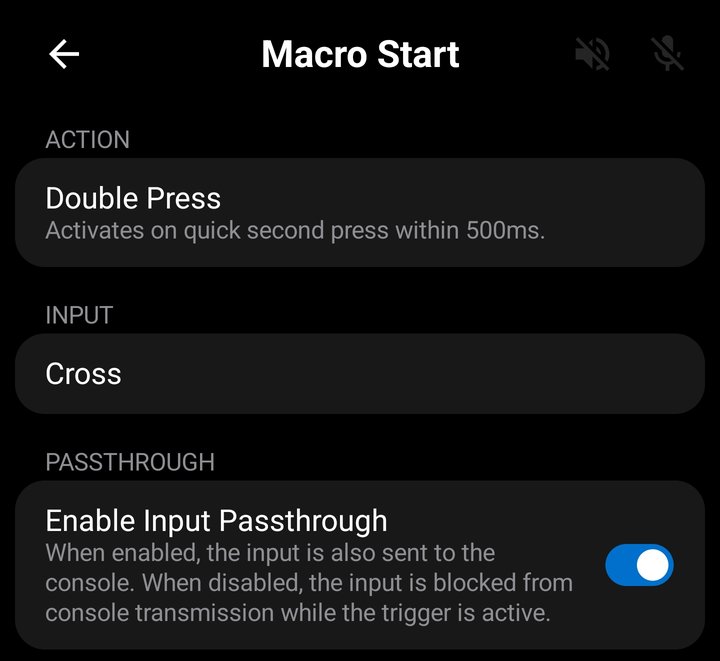
Activates when you press the input twice within 500 milliseconds. The first press starts a timing window — a release must then be registered - followed by a second press occuring within that window, for the trigger to fire. If the window expires without a second press, nothing happens and the next press starts a new window.
For L2/R2 Triggers, a press is considered when the value enters the lower and upper bound set for the input. A release is considered a value of 0.
For sticks, a press is considered when stick enters the selected zones. A release is considered when stick enters deadzone (X,Y value of 0).
Double Press is useful when you want to use a button for its normal in-game function on a single press, but trigger a macro on a double press.
Hold
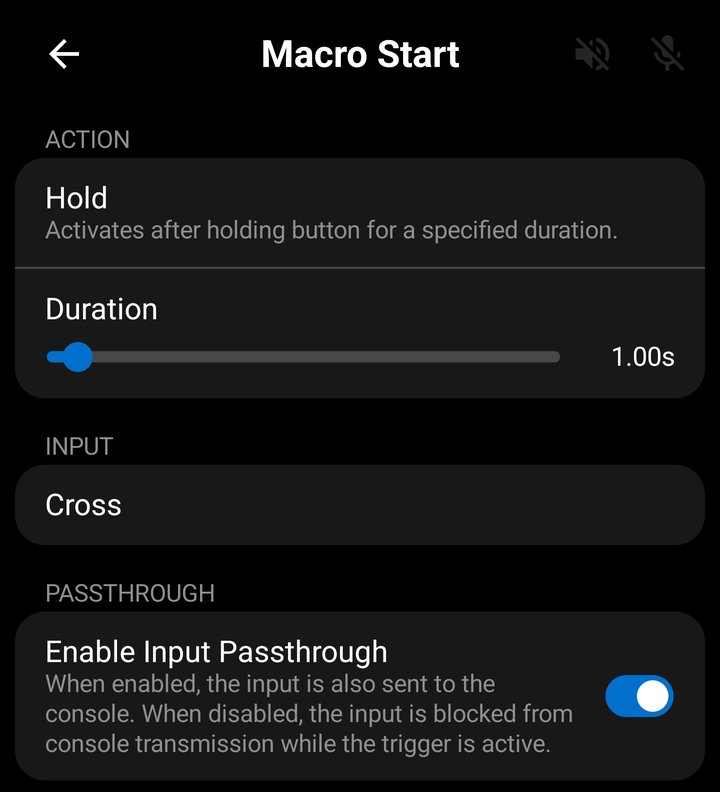
Activates when you hold the trigger input for a specified duration. The timer starts when the input is pressed and fires when the configured hold time is reached. If you release before the time is up, the trigger does not fire.
For L2/R2 Triggers, the trigger fires when the value is held between the lower and upper bound for the hold duration.
For sticks, the trigger fires when stick is held inside the selected zones for the hold duration.
Hold duration is configurable from 0.01 seconds to 20.00 seconds. Adjust it using the slider on the trigger configuration screen, or tap the value to type an exact number in seconds.
Hold triggers are useful for activating macros with an intentional sustained press, avoiding accidental activations from quick taps.
Two-Button Combo
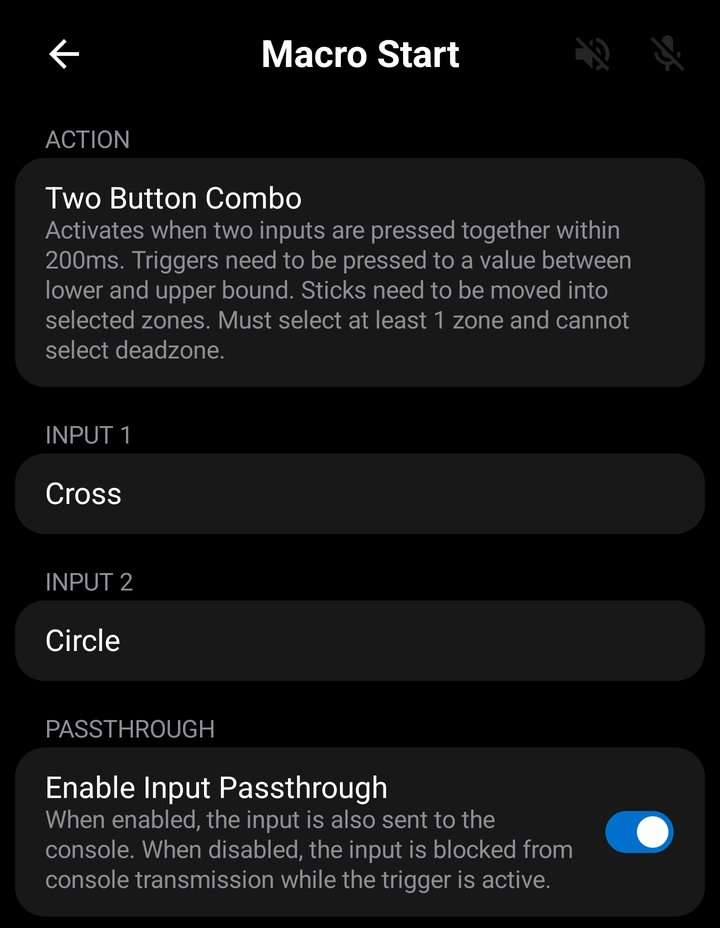
Activates when two inputs are pressed together within 200 milliseconds. You configure both Input 1 and Input 2 — the trigger fires when both are held simultaneously.
The inputs can be any combination: two buttons, a button and a trigger, a button and a stick zone, etc. The order doesn't matter — pressing either input first starts the window, and pressing the second within 200ms fires the trigger.
For L2/R2 Triggers, a press is considered when the value enters the lower and upper bound set for the input.
For sticks, a press is considered when stick enters the selected zones.
Combo triggers are useful for avoiding conflicts with normal gameplay inputs. Since it requires two simultaneous inputs, accidental activations are unlikely.
Sound
Activates when a specific sound is heard from the console — chimes, alarms, music cues, explosions, etc. — rather than from a controller input. Set a trigger's action to Sound to show the sound and threshold settings. See the Sound Triggers section for capturing, testing, and binding sounds.
Image
Activates when a captured on-screen image — an icon, HUD indicator, or any distinct on-screen element — appears in the console's video, rather than from a controller input or sound. Set a trigger's action to Image to show the image, threshold, match mode, and search region settings. See the Image Triggers section for capturing, testing, and binding images.
Input Triggers
The following input types can be used as triggers:

Buttons
Any controller button can be an input trigger: Cross, Circle, Square, Triangle, L1, R1, L3, R3, D-Pad Up/Down/Left/Right, Options, Share, PS Button, and Touchpad Button.
Analog Triggers (L2 / R2)
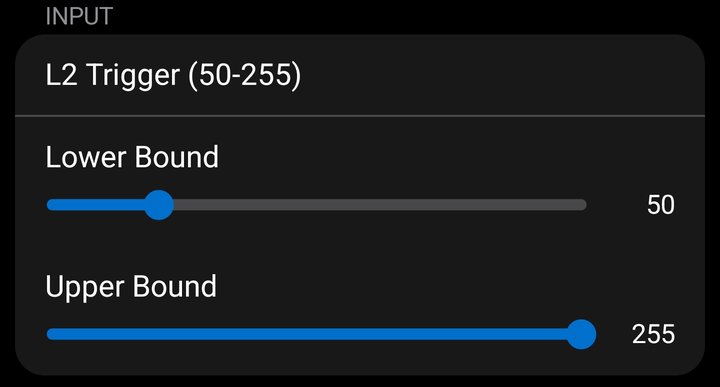
The L2 and R2 analog triggers can be used with a configurable activation range. The range defines how far you need to pull the trigger before it counts as "pressed" (default: 50–255). A dual slider on the trigger configuration screen lets you set the lower and upper bounds.
For example, setting the range to 200–255 means only a near-full pull activates the trigger, while setting it to 10–255 makes it activate on any slight pull.
Analog Sticks (Left / Right)
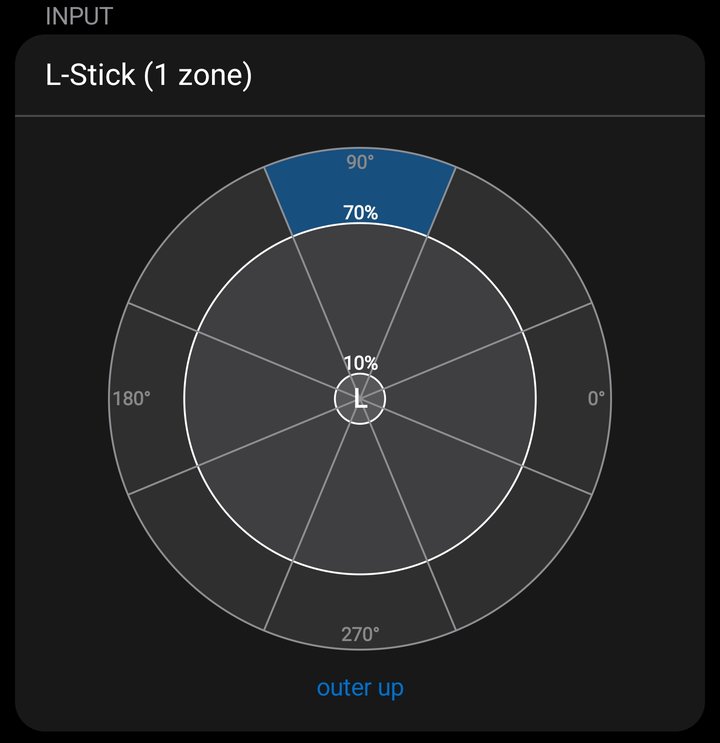
Stick inputs use a zone-based system. The stick's range is divided into 16 zones: 8 inner zones (closer to center, from the deadzone to 70% tilt) and 8 outer zones (from 70% to full tilt). Each zone covers a 45-degree slice in one of eight directions: Right, Up-Right, Up, Up-Left, Left, Down-Left, Down, and Down-Right.
You select which zones activate the trigger. For example, selecting all "Up" outer zones creates a trigger that fires when you push the stick fully upward. Selecting all inner zones creates a trigger that fires on a gentle half-tilt in any direction.
Passthrough
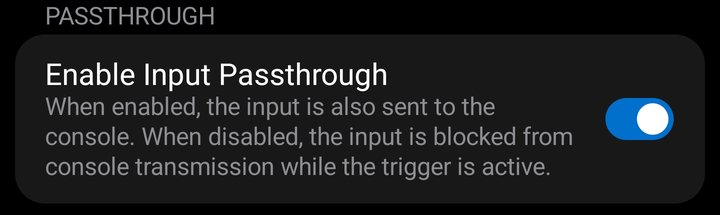
The Passthrough setting controls whether the trigger input is sent to the console before and during trigger activation.
- Passthrough Enabled — The input is sent to the console normally, in addition to triggering the macro. Use this when the trigger input also has an in-game function you want to keep (e.g., using R1 as a trigger while also aiming in-game).
- Passthrough Disabled — The input is blocked from reaching the console and essentially consumed by the trigger system. The input remains blocked until the trigger fires and the input returns to its neutral state (button released, trigger value at 0, or stick back to deadzone). Use this when the trigger input would interfere with gameplay (e.g., Circle triggering a macro — you don't want the initial Circle press to also register in-game).
Passthrough applies to raw controller input only, not to the macro's playback inputs. The macro will always send its inputs to the console regardless of the passthrough setting.
Sound Triggers
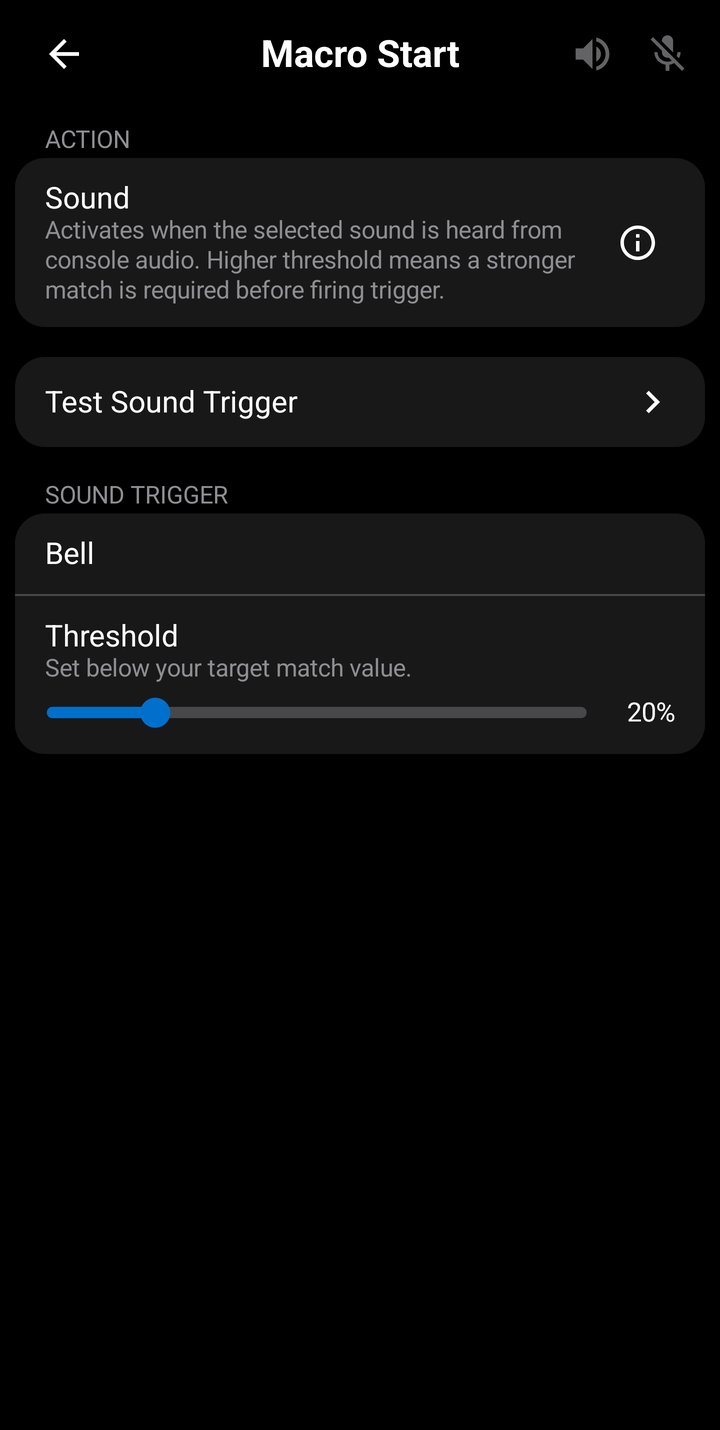
The Sound trigger action lets macros react to game audio rather than to a controller input. Configure a Macro Start or Macro Stop trigger, or a per-macro trigger, to fire when a specific sound is heard from the console — chimes, alarms, music cues, explosions, and more. The Record Start and Record Stop triggers use controller inputs only.
To bind a sound trigger to a macro, open a Macro Start/Stop or per-macro start/stop trigger configuration screen and set the action to Sound. The trigger configuration then exposes two settings:
- Sound — Choose from 500+ predefined sound categories grouped by type (Alerts, Combat, UI, Music, Vehicle, Environmental, Animal, Speech, and more). Tap the sound row to open a browser with search.
- Threshold — The confidence percent at which the trigger fires. Range is 1% to 99%, default 20%. Lower thresholds catch quieter or partially-obscured sounds at the cost of more false positives; higher thresholds are stricter. Use the Test Sound Trigger features to find the right value for your specific game audio.
Click on Test Sound Trigger to navigate to the Sound Triggers screen for testing sound detection.
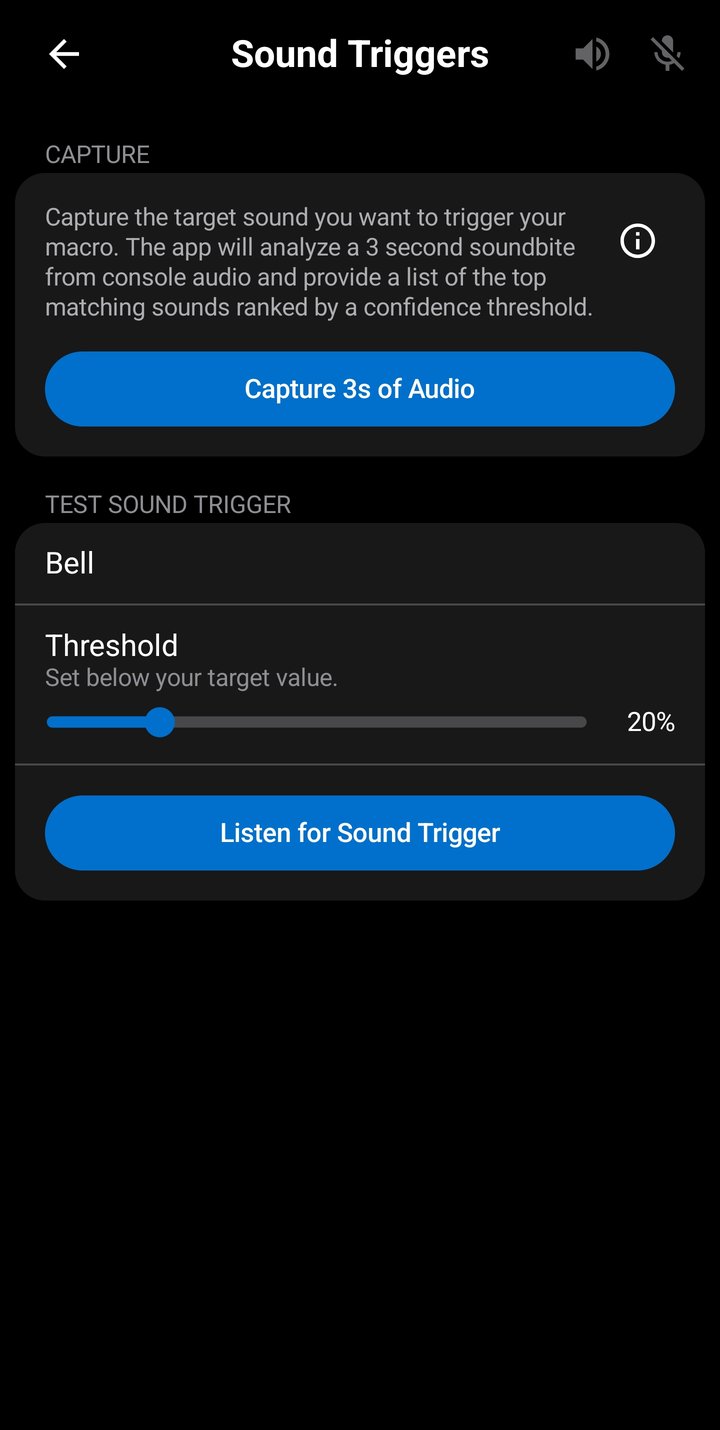
The Sound Triggers screen, accessed from the Settings screen navigation drawer, is the central place to discover and test sounds. It has two main sections:
- Capture — Tap Capture 3s of Audio to capture a 3-second sample. The app then lists the top matching sounds ranked by confidence percent. Useful for identifying which predefined sound best matches your game's audio.
- Test Sound Trigger — Select a sound and a confidence threshold, then tap Listen for Trigger to verify the sound triggers reliably against live game audio before binding it to a macro. Adjust the threshold up or down to balance reliability against false positives.
Both Capture and Test Sound Trigger require an active Remote Play connection to your console — the Sound Triggers screen analyzes the live audio stream as it arrives from your console.
All audio processing runs on-device. Audio is processed in real time as the console streams it to your phone — no audio is recorded, stored, uploaded, or shared.
Free tier users can fully use the Sound Triggers screen to browse, capture, and test sounds. Binding a sound trigger to a macro requires the Pro upgrade — see Limits for details.
Image Triggers
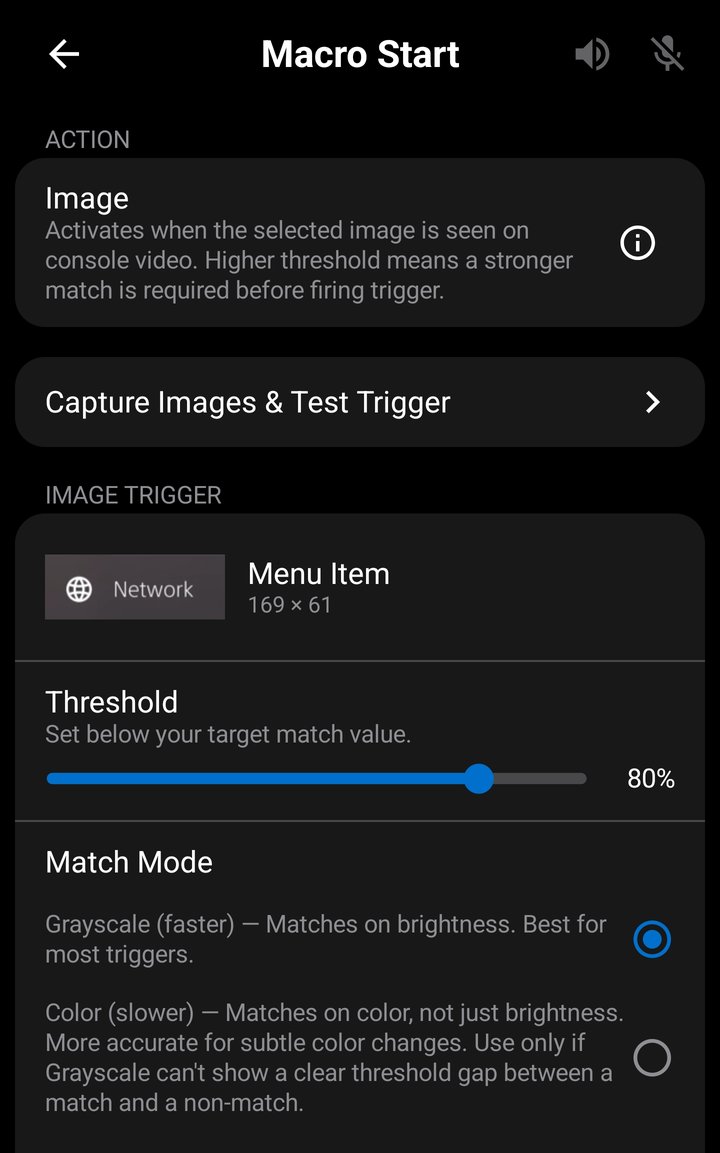
The Image trigger action lets macros react to an on-screen visual rather than to a controller input or sound. Configure a Macro Start or Macro Stop trigger, or a per-macro trigger, to fire when a captured image — an icon, HUD indicator or any distinct on-screen element — appears in your console's video. The Record Start and Record Stop triggers use controller inputs only.
To bind an image trigger to a macro, open a Macro Start/Stop or per-macro start/stop trigger configuration screen and set the action to Image. The trigger configuration then exposes these settings:
- Image — Choose a saved image from your library. Tap the image row to open the library picker.
- Threshold — The match confidence percent at which the trigger fires. Range is 1% to 99%, default 20%. Lower thresholds match more loosely (more false positives); higher thresholds are stricter. Use the Test Image Trigger feature to find the right value.
- Match Mode — Grayscale (faster; matches on brightness — best for most triggers) or Color (matches on color as well, for subtle color changes grayscale can't separate).
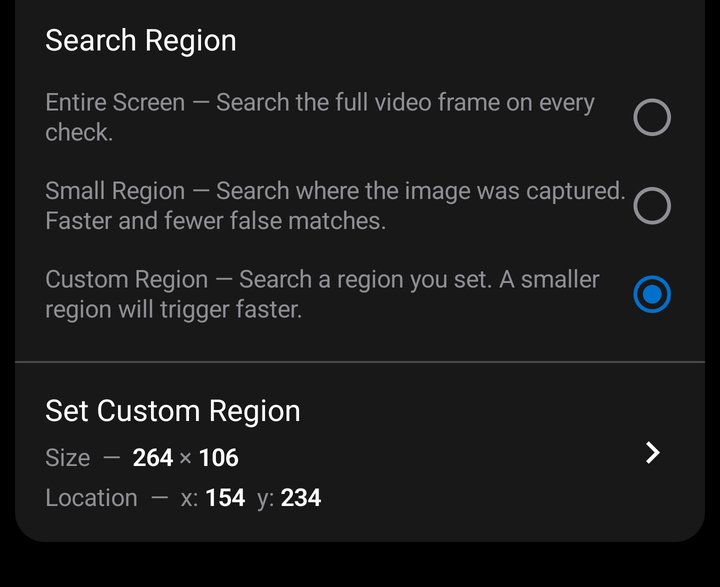
- Search Region — Where on the frame to look.
- Entire Screen — Searches the full frame.
- Small Region — Searches where the image was captured (faster, fewer false positives, for fixed-position elements).
- Custom Region — Lets you set your own search area with a blue rectangle on the video stream. The search area must be larger than the image size or the trigger won't fire. A smaller search area gives faster trigger activation.
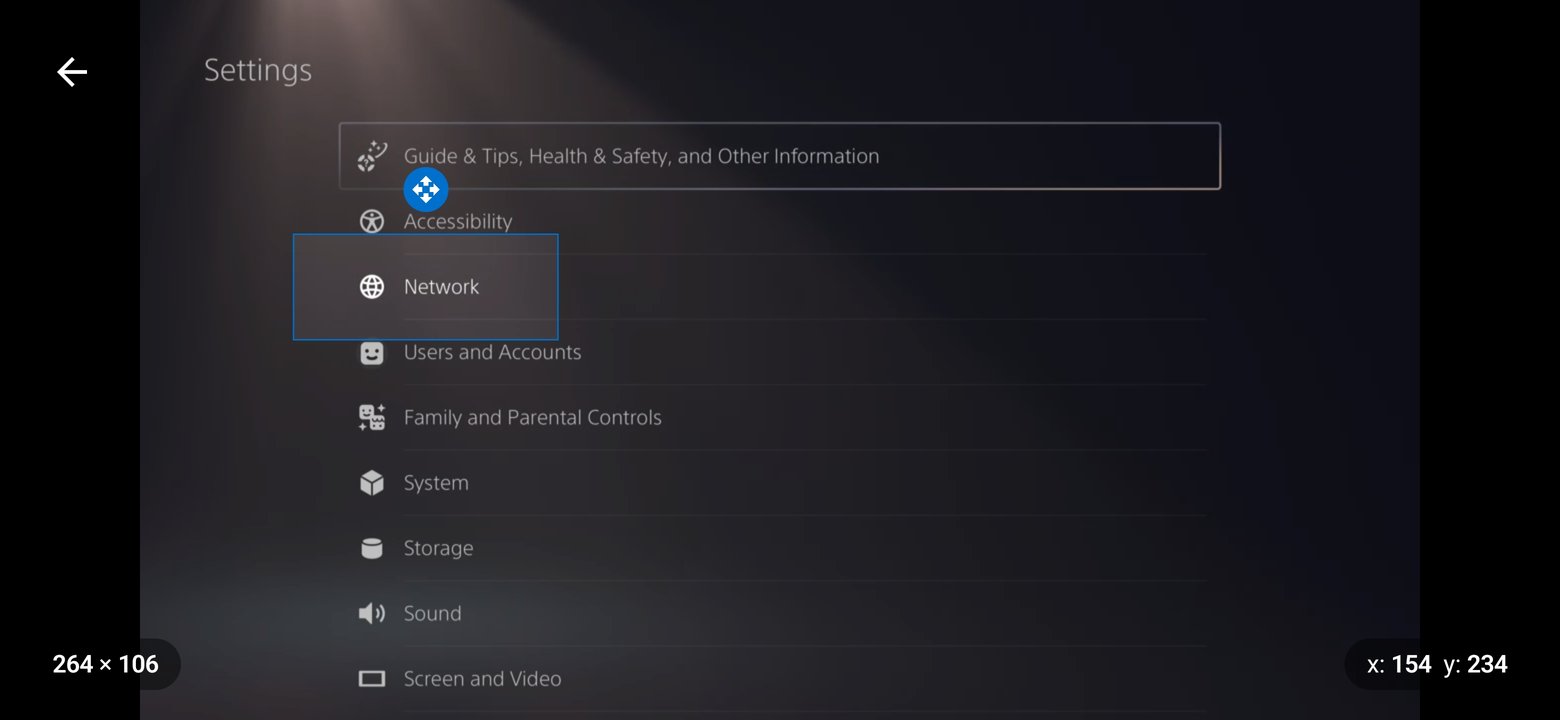
Click on Capture Images & Test Trigger to navigate to the Image Triggers screen for testing image detection.
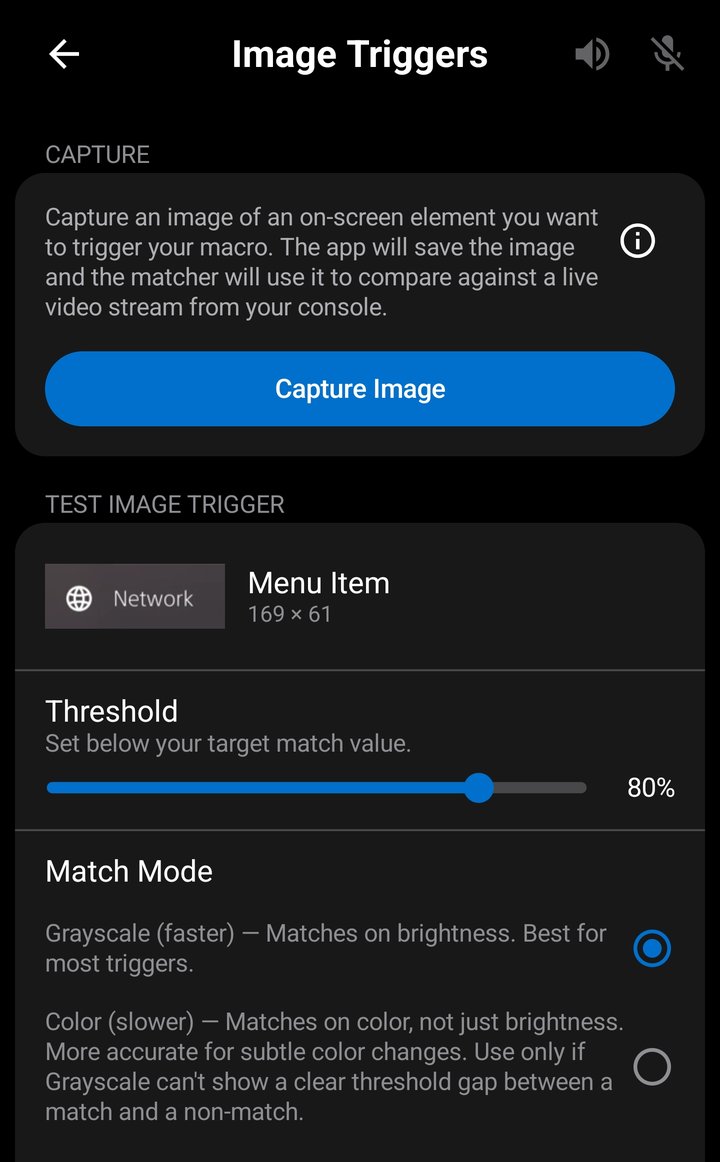
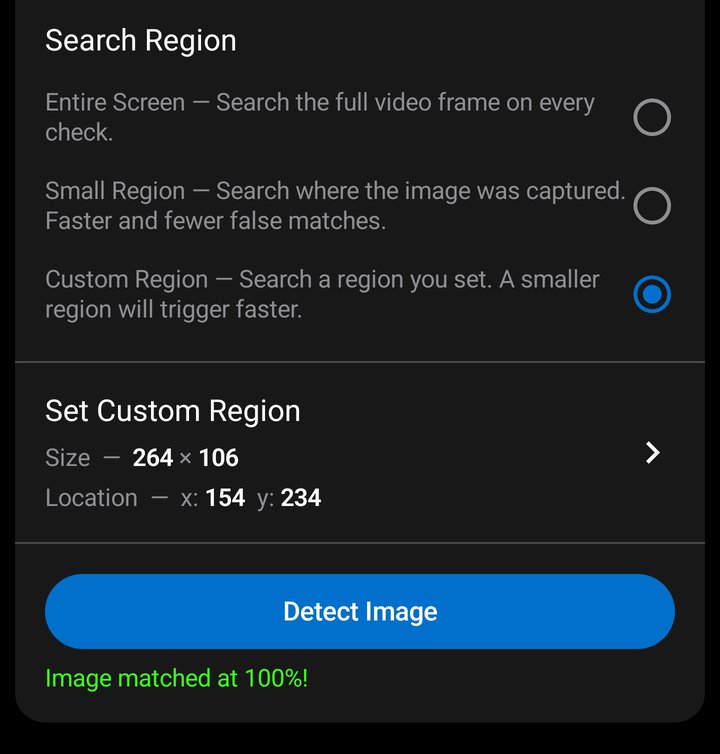
The Image Triggers screen, accessed from the Settings screen navigation drawer, is where you capture and test images. It has two main sections:
- Capture — Tap Capture Image to open the capture screen, which shows your console's live video in landscape. Frame the on-screen element with the resizable red rectangle (pinch to zoom in for small elements), then capture it and save the cropped image to your library with a name. Saved images can be renamed, exported, imported, and deleted from the library.
- Test Image Trigger — Select a saved image, a confidence threshold, match mode and search region, then tap Detect Image to verify the image matches reliably against live video before binding it to a macro. The live match percent is shown as you test so you can tune the threshold.
Both Capture and Test Image Trigger require an active Remote Play connection to your console — the Image Triggers screen works with the live video stream as it arrives from your console.
All image matching runs on-device. Console video is processed in real time as it streams to your phone — no video is recorded, stored, uploaded, or shared. Only the small image templates you explicitly capture are saved locally on your device.
Free tier users can fully use the Image Triggers screen to capture and test images. Binding an image trigger to a macro requires the Pro upgrade — see Limits for details.
Image Library
The Image Library holds the reference images you capture for image triggers. Each saved image is a cropped snapshot of an on-screen element — an icon, HUD indicator, or menu graphic — taken from your console's live video on the capture screen. The library is shared across all image triggers, so you can capture an element once and bind it to any number of macros.
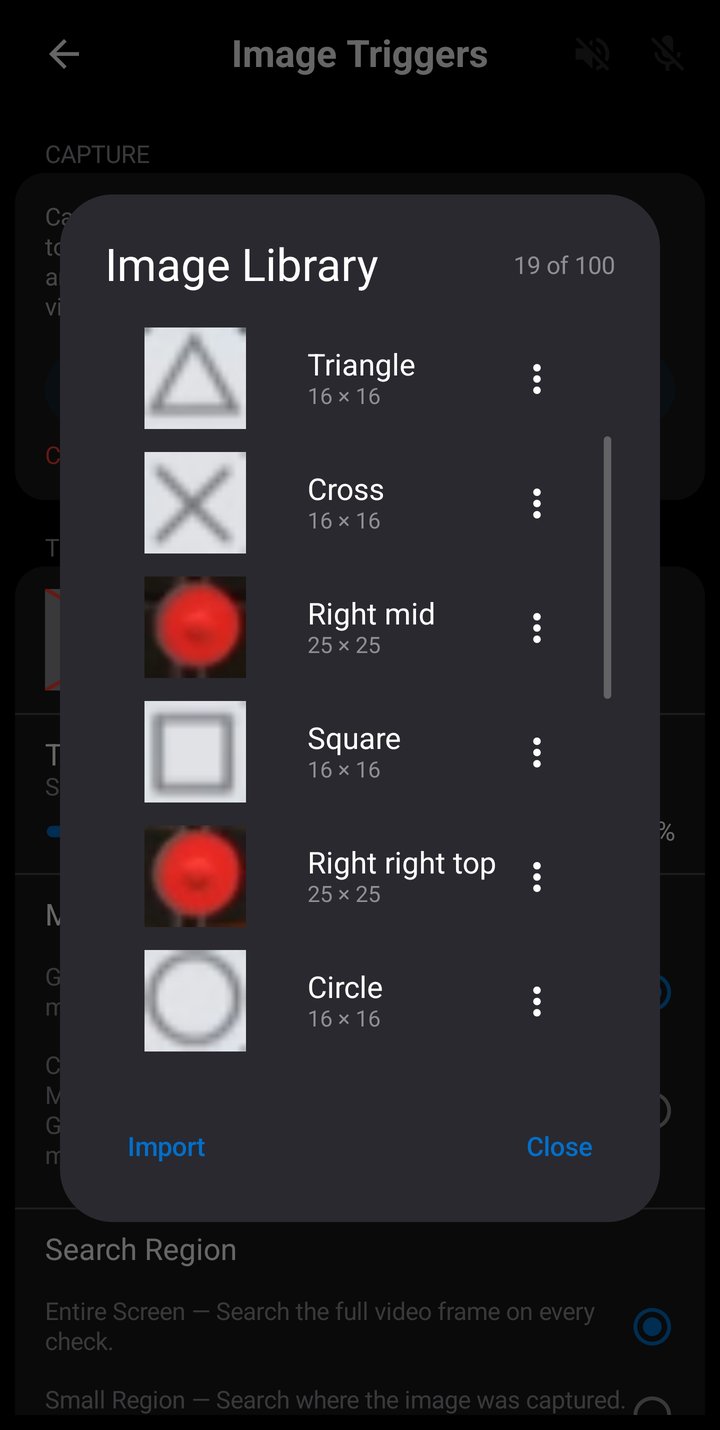
Open the library from the image picker when you set a trigger's action to Image. The dialog header shows how many images you have saved out of the maximum of 100 — this cap applies to both Free and Pro tiers. Each row shows a thumbnail preview, the image's name, and its pixel dimensions.
Each image's 3-dot menu provides three actions:
- Rename — Change the image's name (up to 40 characters).
- Export — Save the image as a PNG file to your device to back it up or share it with another user.
- Delete — Remove the image from the library. Any macro trigger that was using the image is automatically reset to No Image.
Import, at the bottom of the dialog, adds an image from a PNG file. Only images previously exported from ConsoleMacros PX can be imported — an exported file carries the capture information the matcher needs, so arbitrary images, screenshots, or photos are rejected. To detect a new on-screen element, capture it from the live video on the capture screen rather than importing an outside image.
Sample Macros
On first install, ConsoleMacros PX creates a Sample Macros folder with example macros demonstrating common use cases. These are fully editable and can be modified, copied, or deleted like any other macro.
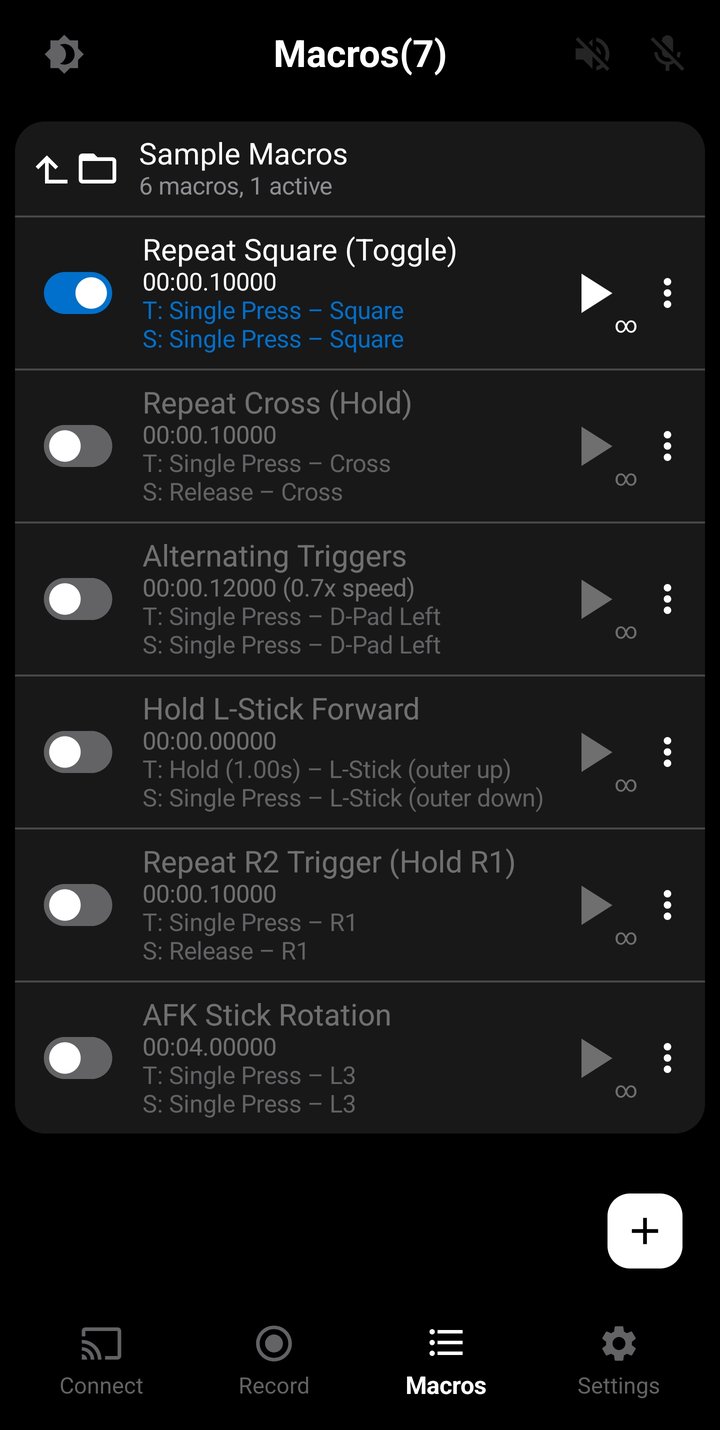
Repeat Square (Toggle)
Rapidly repeats the Square button. Press Square once to start, press again to stop. Uses Single Press trigger with passthrough off so the initial press doesn't register as an input. Loops infinitely with seamless looping.
Repeat Cross (Hold)
Rapidly repeats the Cross button while held. Press Cross to start, release Cross to stop. Uses Single Press start trigger and Release stop trigger. Demonstrates the "hold-to-play" pattern — the macro plays only while you're holding the button.
Alternating Triggers
Alternating L2 and R2 trigger taps. Toggled on/off with D-Pad Left. Runs at 0.70x speed demonstrating speed adjustment.
Hold L-Stick Forward
Locks the left stick in the full-up position for continuous forward movement. Activated by holding the left stick up for 1 second (Hold trigger on the outer-up stick zone), stopped by pressing the left stick down (Single Press on outer-down zone). Passthrough is enabled so you can steer left and right while the macro is active.
Repeat R2 Trigger (Hold R1)
Rapidly repeats R2 trigger pulls. Activated by pressing R1, stopped by releasing R1. Passthrough is enabled so R1 still reaches the console. Demonstrates using one button to activate a macro on a different button.
Stick Rotation
Rotates both sticks clockwise in a full circle over 4 seconds. Toggled on/off with L3 (left stick press). Both sticks move in sync through 36 positions at 10-degree increments. Loops infinitely with seamless looping.
Android App Limits
Free Tier
Free tier users have the following limits, which can be lifted by upgrading to Pro:
- 5-minute maximum continuous macro playback before auto-stop.
- 10 macros maximum across all folders.
- 5-minute maximum recording duration.
- Sound triggers cannot be bound to macros (the Sound Triggers screen is available for browsing, capturing, and testing).
- Image triggers cannot be bound to macros (the Image Triggers screen is available for capturing and testing).
- Console connection requires watching rewarded ads (each ad grants 3 days, up to 30 days total) or a one-time Pro upgrade.
Pro Tier
The one-time Pro upgrade lifts all free tier limits and removes ads:
- Unlimited continuous macro playback.
- 100 macros maximum across all folders.
- 1-hour maximum recording duration (or 5MB limit, whichever is reached first).
- Sound triggers — bind any of 500+ predefined sounds to start or stop a macro or recording.
- Image triggers — bind a captured on-screen image to start or stop a macro or recording.
- Console connection available anytime, no ads required.
General Limits
The following limits apply to all users regardless of tier:
- 10 PSN accounts maximum on the Connection Screen.
- 10 consoles maximum on the Connection Screen.
- 20 user folders maximum (plus the permanent Recorded Macros folder).
- 10 active macros per folder. The limit applies to each folder independently. Active macros are loaded into memory for instant playback and trigger detection while their folder is open.
- 10 button mappings maximum in the Mappings settings tab.
- 100 images maximum in the Image Library, shared across all image triggers.
- 0.10x to 10.00x playback speed range, in 0.01x steps.
- 40 characters maximum for macro and folder names.
When a limit is reached, the app displays a message and prevents the action. Free tier users hitting a tier limit also see an upgrade prompt.
Troubleshooting
Trigger is not firing
- Make sure the trigger is enabled (toggle is on) for the macro or record screen.
- For macro triggers, make sure the macro is activated (toggle switch on the macro row is on).
- Check the Controller Test screen to verify the app is receiving input from your controller.
- If a stick zone trigger is not firing, check the enable/disable stick settings, deadzone, clamp, and invert settings for each stick.
- If an analog trigger (L2/R2) trigger is not firing, check the deadzone and clamp settings for each trigger.
- Check for any button mappings that may be configured in the Settings — mapped buttons will trigger as the remapped output, not the physical button pressed.
Import fails
- The file must be a valid JSON file exported by ConsoleMacros PX. Files from other apps or platforms are not compatible.
- If creating or editing a file manually, try exporting a macro with various input types first to get an idea of the JSON syntax. Exported files include a guide at the top that outlines all valid keys, values, and format specifications.
Recorded macro has missing inputs
- Check the Record Options (gear icon on the Record Screen). Input types like sticks, triggers, or D-Pad may be filtered out if their recording filter is disabled.
- If sticks are not recording correctly, check the enable/disable stick settings, deadzone, clamp, and invert settings for each stick.
- If triggers are not recording correctly, check the deadzone and clamp settings for each trigger.
- Check for any button mappings that may be configured in the Settings — mapped buttons will record as the remapped output, not the physical button pressed.
- Check the mute trigger in General Settings. If enabled and passthrough is disabled for the trigger input, that input will be blocked globally on all screens.